— Hackers say ‘nay’ to 2FA —
Security is a big thing these days. Hackers are becoming more and more professional. And your personal data (email, photos) and even your financial data (bank accounts, bitcoins) are at stake.
Most of us agree using a username-password combination to secure accounts simply is not secure enough anymore. An additional step to verify that you are who you say you are, improves security.
In the early days this was a personal answer to a predefined question:
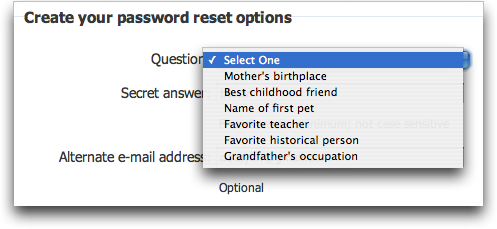
The two main concerns regarding this question-answer verification are: 1) you have to remember the answer you have given some while ago (which is easy to forget) and 2) it is still a static verification which is done on the same device the username and password were entered.
Figure 1. Predefined questions to ‘improve’ security
Two Factor Authentication (2FA) is here to the rescue. 2FA is an authentication method in which a user is granted access by confirming users’ claimed identities by using a combination of different factors:
1. Knowledge factor: something they know,
2. Possession factor: something they have, or
3. Inherence factor: something they are.
The username-password combination is the first factor, this is the knowledge factor. The most common second factor is the possession factor: using a device to generate a one-time password (OTP), which is a password that is valid for only one login session.
Smartphone apps like Google Authenticator, Authy and LastPass are examples of such possession factors.
2FA uses a Time-based One-time Password algorithm (TOTP). I will elaborate on this algorithm in the ‘Algorithm’ section.
By adding an extra factor to your authentication process it becomes way more difficult for hackers to hack into your account. They will probably leave you alone, because it takes too much time for them. They prefer easier targets. Therefore the slogan: “Hackers say ‘nay’ against 2FA”
Two Factor Authentication process
Let’s zoom in on the 2FA process, based on the following diagram:
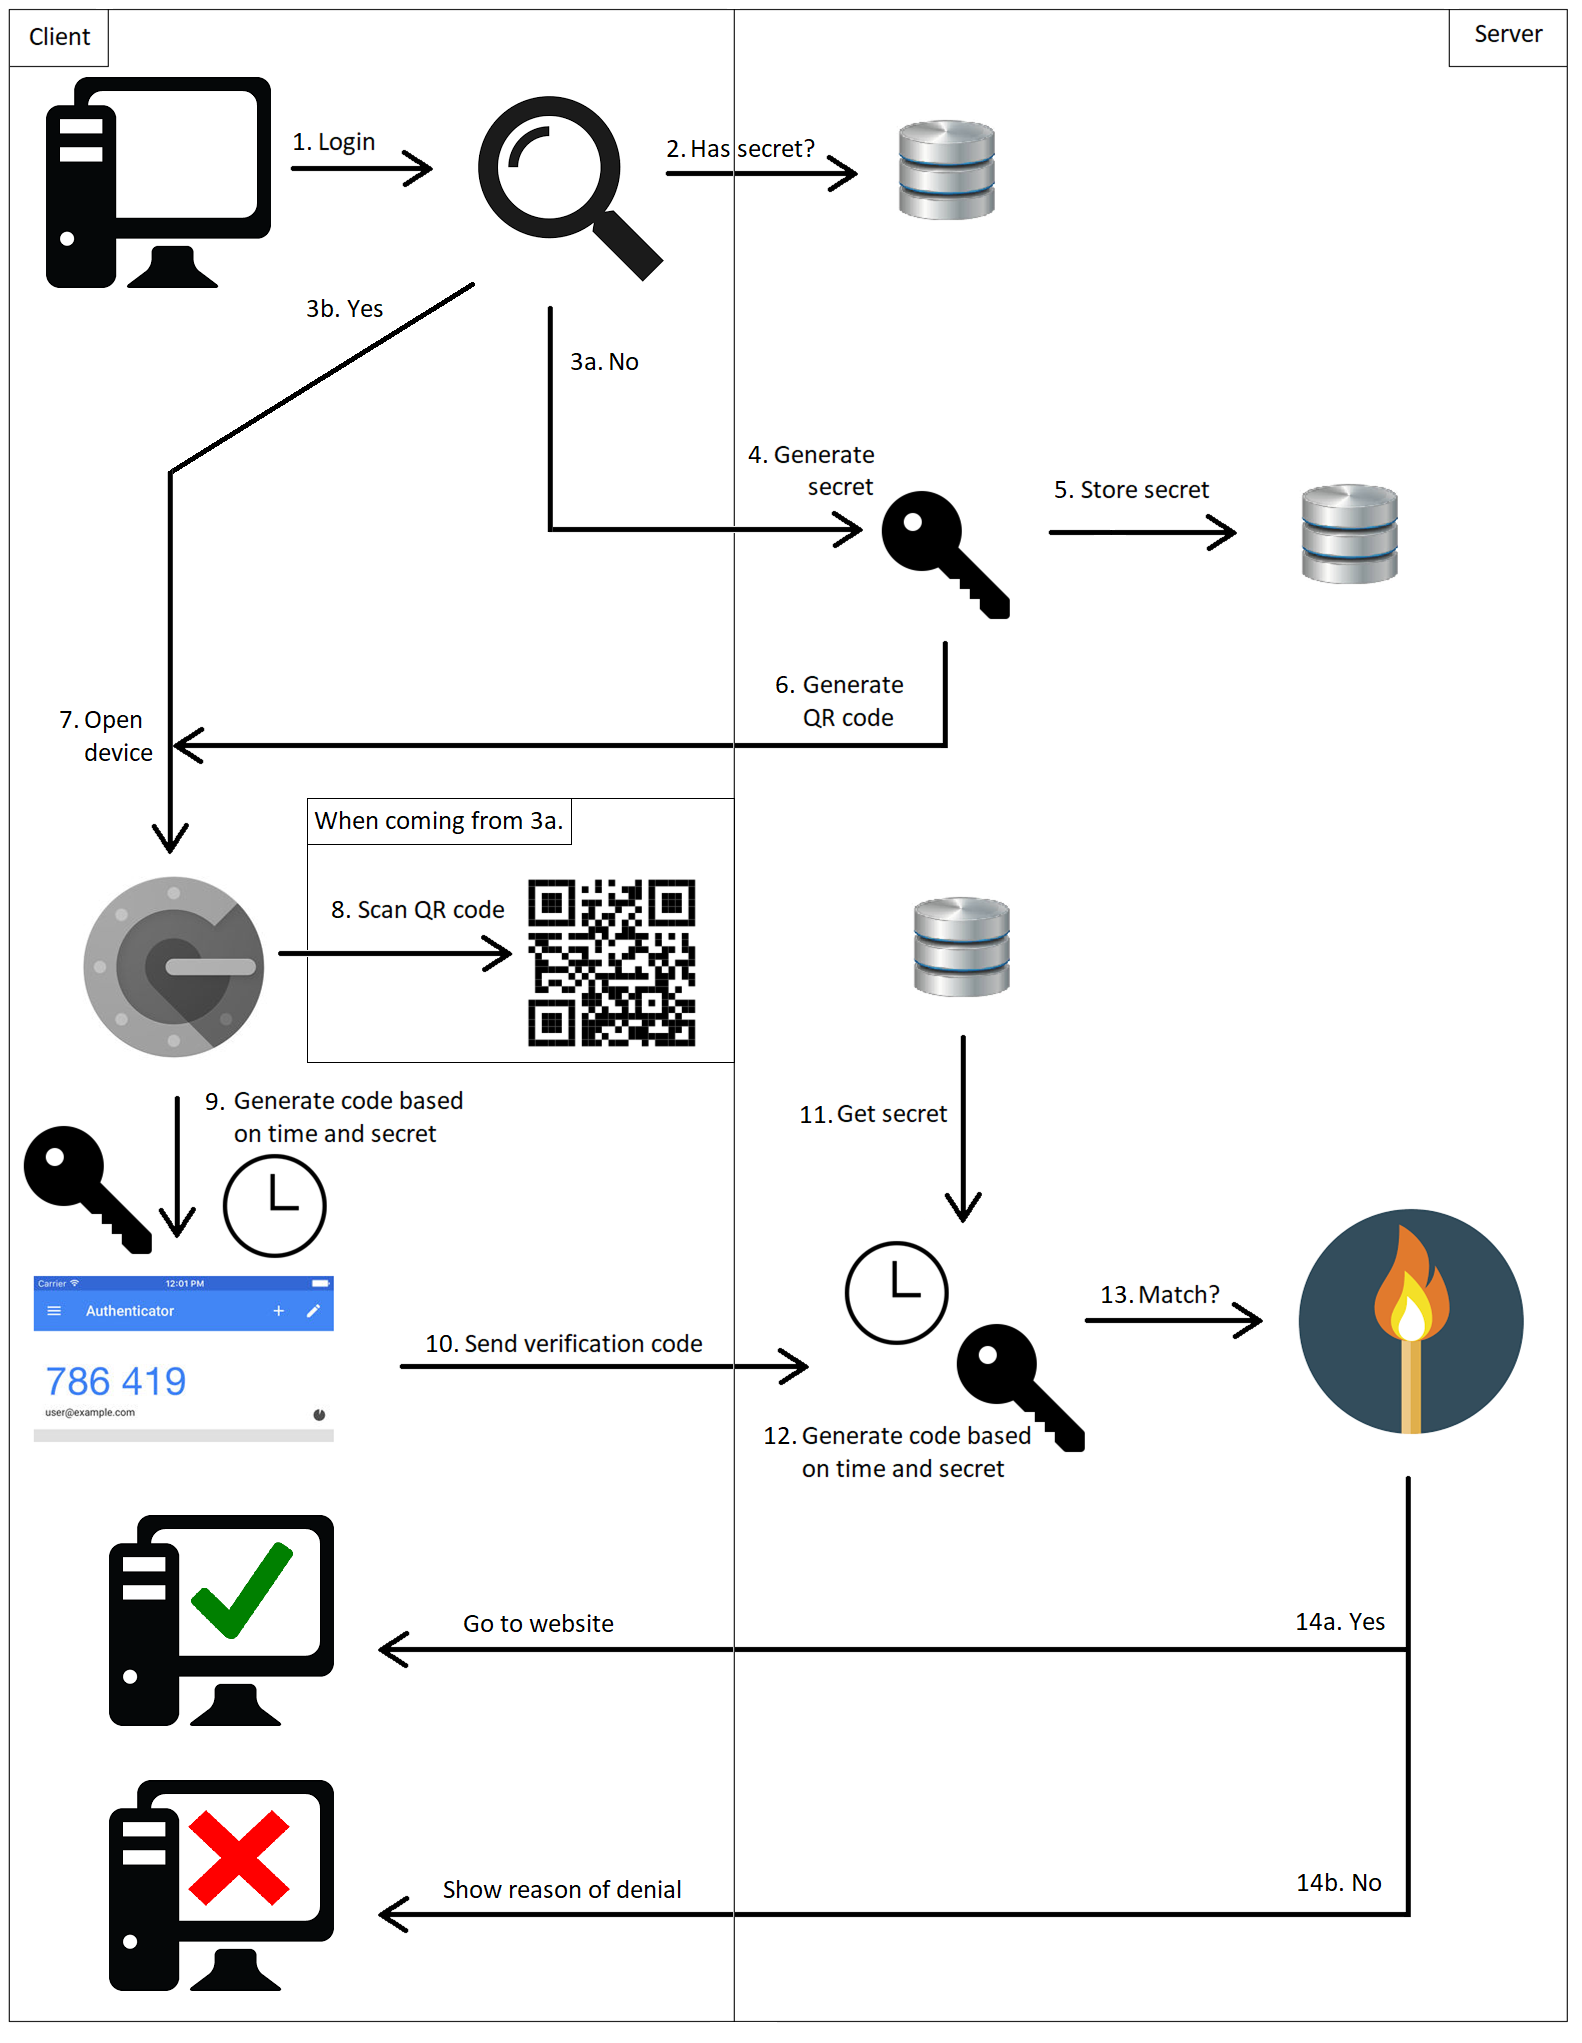
Figure 2. Two Factor Authentication process
1. The user logs in into the application using his credentials.
2. First it checks if the user already has a generated secret.
3. The answer will be either a ‘yes’ or a ‘no’.
a. No: The user has no secret (meaning he has not used 2FA for this account yet). Continues to step 4.
b. Yes: The user has used 2FA for this account before. Continues to step 7.
4. When using 2FA for the first time, you first have to register your account to your device. A secret is generated.
5. The secret is stored in the application (e.g. in a database).
6. A QR code is created, which consists of some data: the username, the name of the application and a generated secret.
7. The user opens the authentication device (the Google Authenticator app in this example).
8. The registration is done by scanning the QR code via the authentication app on your smartphone. This has to be done only when the user registers 2FA for the first time.
9. The device generates a verification code based on the secret and the current time. This code is valid for a limited period of time (30 seconds by default). After this period a new verification is generated.
10. This verification code is sent to the application.
11. The application retrieves the secret of the user (from a database).
12. The application generates the verification code based on the secret and the current time.
13. The application checks if both codes match.
14. The answer will be either a ‘yes’ or a ‘no’.
a. Yes: The user will be logged in to the application.
b. No: The user will be denied access and shown why (e.g. invalid verification code).
Algorithm
As stated, 2FA uses a Time-based One-time Password algorithm (TOTP). TOTP is based on the HMAC (Hash-based Message Authentication Code)-based One-time Password algorithm (HOTP). Both are OTP algorithms. An OTP algorithm generates a numeric code based on two pieces of information: a static piece (a secret key) and a dynamic piece (a moving factor).
TOTP(K) = HOTP(K,Ct)
K: Key (secret)
Ct: Time counter (moving factor, see below)
Ct = (T – T0) / Tx
T: Current (Unix) time in seconds
T0: Starting time in seconds (default 0)
Tx: Expiration time in seconds (default 30)
In HOTP the moving factor is a physical counter. By increasing the counter, the generated verification code, usually 6 or 8 digits, will be different each time. TOTP algorithm uses time as moving factor and will therefore be different each time. The HOTP algorithm functions as follows:
HOTP(K, C) = Truncate(HMAC(K, C))
K: Key (secret)
C: Counter (in HOTP a physical counter, in TOTP a time counter)
HMAC: HMAC-SHA1 of 8-byte counter and key
The output of the HMAC-SHA1 calculation is 20 bytes (which is 160 bits), so we need to truncate this value into something that can easily be entered by a user.
We can describe the Truncate(HMAC(K, C)) operation in 3 distinct steps:
Step 1: Generate an HMAC-SHA-1 value
HmacString = HMAC-SHA-1(K,C)
HmacString: 20-byte string
Step 2: Generate a 4-byte string (Dynamic Truncation)
OffsetBits = the low-order 4 bits of HmacString [19]
Offset = FromBitsToNumber(OffsetBits)
OffsetValue = HmacString [OffSet]… HmacString [OffSet+3]
Bits = the last 31 bits of OffsetValue
Step 3: Compute an HOTP value
Number = FromBitsToNumber(Bits)
Result = Number % (10 ^ Digit)
Digit: the number of digits of the numeric code
When the length of the Result is lower than the number of digits, it will get leading zeros until the desired length is reached. See an example in the following section.
Example
Here is an example of the algorithm returning a numeric code of 6 digits. Let’s say the result of the HMAC-SHA-1, given a certain secret and a certain counter, is the following 20-byte String (HmacString):
1f 86 98 69 0e 02 ca 16 61 85 50 ef 7f 19 da 8e 94 5b 55 5a
By showing the index of each byte of the HMAC String, you get the following result:
   -------------------------------------------------------------
   | Byte Index                                                |
   -------------------------------------------------------------
   |00|01|02|03|04|05|06|07|08|09|10|11|12|13|14|15|16|17|18|19|
   -------------------------------------------------------------
   | Byte Value                                                |
   -------------------------------------------------------------
   |1f|86|98|69|0e|02|ca|16|61|85|50|ef|7f|19|da|8e|94|5b|55|5a|
   -------------------------------------------------------------
The byte on the 19th index is 5a (HmacString[19]).
The binary representation of 5a is 0101 1010.
The low-order 4 bits are 1010 (OffsetBits).
The numeric representation of 1010 is 10 (Offset).
The byte on the 10th index is 50 (HmacString[Offset]).
The bytes of the next 3 indices are:
– ef (HmacString[Offset+1]: index 11)
– 7f (HmacString[Offset+2]: index 12) and
– 19 (HmacString[Offset+3]: index 13).
The total byte String of the 4 indices is 50ef7f19 (OffsetValue).
The binary representation of 50ef7f19 is 0101 0000 1110 1111 0111 1111 0001 1001.
The last 31 bits of the binary representation are 101 0000 1110 1111 0111 1111 0001 1001 (Bits).
The numeric representation is 1357872921 (Number).
The result of 1357872921 % 10 ^ 6 is 872921 (Result).
So for this example, the numeric code is 872921.
N.B. See below a real example from the Google Authenticator app. The result from the algorithm was 270, so it was presented with 3 leading zeros to reach the desired length of 6.

Figure 3. Authentication code with leading zeros.
Two Factor Authentication in your own application
This is how to use 2FA in your own application. There are 4 main parts: generating the secret, generating the QR code, generate the verification code and verifying the verification code.
Generate a secret
The secret is a base32 encoded String. Make sure that the encoded String has a length of a multiple of 8 (so 8, 16, 24 etc.). It is wise to have a minimum length of 16.
Keep in mind that a base32 encoded String uses the equal sign (“=”) for padding to fill up the blank spaces. E.g. an encoded String with a length of 20 will get 4 padding characters to get to the length of 24 (to get to a String which is a multiple of 8).
To create the encoded String with a sufficient length you can do 3 things:
1. Make sure the secret String produces sufficient length of base32 encoding, so you don’t have to worry about the padding:
private static final int SECRET_LENGTH = 16;

public String generateSecret() {
        String secret = "secret" + System.currentTimeMillis();
        String encoding = base32.encodeAsString(secret.getBytes());
        return encoding.substring(0, SECRET_LENGTH);
}
2. Determine length of secret dynamically based on base32 encoding without the padding:
public String generateSecret() {
        String secret = UUID.randomUUID().toString().replace("-", "");
        String encoding = base32.encodeAsString(secret.getBytes());
        String encodingWithoutPadding = encoding.replace("=", "");
        int multiplies = encodingWithoutPadding.length() / 8;
        return encodingWithoutPadding.substring(0, (8 * multiplies));
}
3. Create your own secret which satisfies the base32 encoding:
private static final int SECRET_LENGTH = 16;

public String generateSecret() {
    StringBuilder sb = new StringBuilder(SECRET_LENGTH);
    Random random = new SecureRandom();
    for (int i = 0; i < SECRET_LENGTH; i++) {
        int val = random.nextInt(32);
        if (val < 26) {
            sb.append((char) ('A' + val));
        } else {
            sb.append((char) ('2' + (val - 26)));
        }
    }
    return sb.toString();
}
Source. Tip: Be creative and decide how you want your secret to be generated. This way you have knowledge and control of how the secret is structured and used within the application.
Generate QR code
When you want to use 2FA for the first time, you have to connect your device to the generated secret. Google has an API with which you can generate a QR code by providing the right data. For more information see: https://developers.google.com/chart/infographics/docs/qr_codes.
You have to provide the URL for the QR code with 3 types of information:
1. The application name: this name will be shown in the device.
2. The username: the username which is used to login. When this is an email address, make sure that you properly escape it.
3. The secret: this is the base32 encoded generated secret.
public String generateQrCodeUrl(final String applicationName, final String emailAddress,
                                final String secret) {
    String escapedEmailAddress =
           URLEncoder.encode(emailAddress, StandardCharsets.UTF_8.name());
    return "https://chart.googleapis.com/chart?chs=200x200&cht=qr&chld=M|0&cht=qr&chl=" +
            "otpauth://totp/" + applicationName + ":" + escapedEmailAddress +
            "%3Fsecret%3D" + secret;
}
Because of the otpauth protocol in the URL of the QR code, the device will recognize the QR code as 2FA. After the protocol we have to define the type of 2FA which is being used. The values can be ‘hotp’ or ‘totp’. Since we are using 2FA, the algorithm is the TOTP algorithm.
Generate verification code
This is where the magic happens. Here we translate the 2FA algorithm into Java code. The generation of the verification code returns an Integer and will get leading zeros when its length is lower than 6.
Please find an elaborate explanation of the implementation of generating the verification code in the section ‘Implementation’.
public String generateAuthenticationCode(final String secret) throws Exception {
    int verificationCode = generateVerificationCode(secret);
    return String.format("%06d", verificationCode);
}

private int generateVerificationCode(final String secret) throws Exception {
    byte[] key = base32.decode(secret);

    byte[] timeCounter = new byte[8];

    // Calculate time
    long time = System.currentTimeMillis() / 1000 / NR_OF_SECONDS;

    // Determine time counter from time
    for (int i = timeCounter.length - 1; time > 0; i--) {
        timeCounter[i] = (byte) (time & 0xFF);
        time >>= 8;
    }

    // Encrypt the data with the key and return the HMAC SHA1 of it in hex
    SecretKeySpec signKey = new SecretKeySpec(key, HMAC_SHA1_ALGORITHM);
    Mac mac = Mac.getInstance(HMAC_SHA1_ALGORITHM);
    mac.init(signKey);

    // HMAC result as 20-byte String
    byte[] hmacString = mac.doFinal(timeCounter);

    // Take byte at index 19
    int lastByte = hmacString[hmacString.length - 1];

    // Take lower-order 4 bits
    int offset = lastByte & 0xf;

    int offsetValue = 0;

    // Loop over the following 3 indices
    for (int i = offset; i <= offset + 3; i++) {
        // Get bytes of next offset index
        int nextByte = hmacString[i] & 0xff;

        // Shift bytes to the left
        offsetValue = offsetValue << 8;

        // Add bytes of next offset index
        offsetValue = offsetValue | nextByte;
    }

    // Cut off first bit
    offsetValue = offsetValue & 0x7fffffff;

    // Take the last 6 digits as verification code
    return offsetValue % 1000000;
}
Verify verification code
Verifying the verification code is quite simple. The application will generate an authentication code based on the secret of the user (just like in the previous step) and it will check if the authentication code is equal to the user input.
If so, the user will be logged in, otherwise there is something wrong. For instance when the user has waited too long when submitting the verification code and therefore this verification code has become invalid.
public Boolean verifyAuthenticationCode(final String secret, final String userInput) {
    String compare = generateAuthenticationCode(secret);
    return userInput.equals(compare);
}
Implementation
Let’s take a look at the implementation of the algorithm again. We split up the implementation into 6 code blocks. For each code block we describe the part of the algorithm it covers.
private int generateVerificationCode(final String secret) throws Exception {
    byte[] key = base32.decode(secret);

    byte[] timeCounter = new byte[8];

    // Calculate time
    long time = System.currentTimeMillis() / 1000 / NR_OF_SECONDS;

    // Determine time counter from time
    for (int i = timeCounter.length - 1; time > 0; i--) {
        timeCounter[i] = (byte) (time & 0xFF);
        time >>= 8;
    }
Code block 1: The secret is passed to the method and the time counter is calculated and transformed into a byte-array, because the HMAC algorithm accepts only byte-arrays.
Step 1: Generate an HMAC-SHA-1 value
HmacString = HMAC-SHA-1(K,C)
    // Encrypt the data with the key and return the HMAC SHA1 of it in hex
    SecretKeySpec signKey = new SecretKeySpec(key, HMAC_SHA1_ALGORITHM);
    Mac mac = Mac.getInstance(HMAC_SHA1_ALGORITHM);
    mac.init(signKey);

    // HMAC result as 20-byte String
    byte[] hmacString = mac.doFinal(timeCounter);
Code block 2: This is the standard Java way of using the HMAC algorithm.
Step 2: Generate a 4-byte string (Dynamic Truncation)
OffsetBits = the low-order 4 bits of HmacString [19]
Offset = FromBitsToNumber(OffsetBits)
    // Take byte at index 19
    int lastByte = hmacString[hmacString.length - 1];
    // Take lower-order 4 bits
    int offset = lastByte & 0xf;
Code block 3: The byte of the last index is retrieved and the last 4 bits are returned by using the bitwise AND (&) operator, which returns only the bits that are on both sides of the operator.
For example:
int lastByte = 1010 1010
0xf = 0000 1111
Then 1010 1010 & 0000 1111 = 0000 1010 = 1010
OffsetValue = HmacString [OffSet]… HmacString [OffSet+3]
int offsetValue = 0;

    // Loop over the following 3 indices
    for (int i = offset; i <= offset + 3; i++) {

        // Get bytes of next offset index
        int nextByte = hmacString[i] & 0xff;

        // Shift bytes to the left
        offsetValue = offsetValue << 8;

        // Add bytes of next offset index
        offsetValue = offsetValue | nextByte;
    }
Code block 4: We obtain the values from the HMAC string starting from the index defined in offset. By shifting the OffsetValue 8 bits to the left, we create the possibility to add the bytes of the next index to the OffsetValue by using the bitwise OR (|) operator. This operator returns the bits that are on one of both sides of the operator.
For example:
int offsetValue = 1010 1010
int nextByte = 1111 0000
offsetValue << 8 = 1010 1010 0000 0000
offsetValue | nextByte = 1010 1010 0000 0000 | 1111 0000 = 1010 1010 1111 0000
When the for-statement has iterated over all indices, the OffsetValue consists of 32 bits (4 indices, 8 bits each)
Bits = the last 31 bits of OffsetValue
// Cut off first bit
    offsetValue = offsetValue & 0x7fffffff;
Code block 5: By taking the last 31 bits of the OffsetValue, we can use the &-operator again, making sure that the first bit of the OffsetValue is a 0 and therefore will not be taken over into the result.
Step 3: Compute an HOTP value
Number = FromBitsToNumber(Bits)
Result = Number % 10 ^ Digit
    // Take the last 6 digits as verification code
    return offsetValue % 1000000;
}
Code block 6: We return the last 6 digits by using the modulo operator.
Easy does it – enjoy keeping your applications safe!
PS This blogpost is also available as a workshop. For details please mail info@craftsmen.nl Or find another workshop here.
Sources
https://en.wikipedia.org/wiki/Multi-factor_authentication
https://github.com/j256/two-factor-auth
https://en.wikipedia.org/wiki/Time-based_One-time_Password_algorithm
https://www.owasp.org/images/6/67/Klas_otp_OWASPgbg20140219.pdf
https://tools.ietf.org/html/rfc4226
http://cactus.io/resources/toolbox/decimal-binary-octal-hexadecimal-conversion
https://cryptii.com/pipes/integer-encoder