Working with microservices the most vulnerable and error prone dependencies are dependencies to other services outside your own network. When those services are temporarily unavailable or malfunction it is necessary to take measures to cope with these failing services. Such as avoiding to keep calling external services that are failing constantly, and/or other precautions, to make sure that your service keeps working.
One solution to prevent a cascade of failing services is the so-called ‘circuitbreaker’.
The idea is very simple. Wrap calls to an external service in a circuitbreaker object to handle the calls and errors. If the number of errors is above a certain configured threshold, the circuitbreaker is triggered to OPEN and prevents calling the failing service for some time. It returns an error immediately, and whenever possible it can return a ‘fallback’-response.
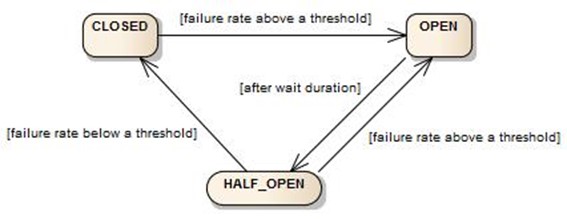
(image from https://resilience4j.readme.io/docs/circuitbreaker)
After a while the circuitbreaker transitions back to HALF-OPEN state and some calls to the failing service resume. When the failure rate is below the configured threshold, the circuitbreaker transitions to CLOSED and all calls are resumed.
For several years a Netflix implementation for the circuitbreaker pattern as described above was used by a lot of applications. This implementation is called Hystrix and did a really good job. The Spring Cloud Netflix project made an integration with Spring Boot Apps very easy and delivered realtime monitoring, options for defining fallbacks and implementing caching.
Hystrix end-of-life
However, in November 2018 Netflix announced that the Hystrix project was put to ‘maintenance mode’ and active development on this library stopped. When Spring announced in October 2019 that the Hystrix dashboard would be removed from Spring Cloud 3.1, Hystrix was officially declared dead.
Many developers had been using this framework for years and were desperately seeking for a worthy successor. They found one in Resilience4J (https://github.com/resilience4j/resilience4j).
Resilience4J is a lightweight ‘fault tolerance’ framework with several functions like a circuitbreaker, rate-limiter, retry-functionality and caching.
In combination with Feign, a declarative webservice, configuring Resilience4J is easy and pretty straightforward.
Demo-project with examples
In order to show how to configure a Feign client with a Resilience4J circuitbreaker I’ve created a simple setup in https://gitlab.com/craftsmen/resilience4j-demo <- Please checkout this project while reading this blogpost and check the details on how the following is configured.
The Gitlab-project consists of 2 projects:
- a demo-application
- a demo-service
Both projects are default, out-of-the-box, Spring-boot projects. The demo-application runs at port 8080, the demo-service at port 8081. Both applications start by running the @SpringBootApplication annotated classes.
The demo-application has two REST-endpoints:
The first REST-endpoint (http://localhost:8080/products) calls the demo-service to retrieve all products. This endpoint is created to show how to configure the HTTP-client using Feign.
The second REST-endpoint (http://localhost:8080/all) calls our demo-service for three products and demonstrates how to configure our Resilience4j circuitbreaker.
Setup of this configuration is described in the following steps.
Calling an ‘external’ service from our demo-application
For calling our demo-service we use Feign, a declarative webservice client for calling external services. Let’s create a Java interface class and annotate it with the right annotations (url, headers, http method and arguments).
First an extra dependency needs to be added in order to use Feign. Add the following dependency:
        <dependency>
            <groupId>org.springframework.cloud</groupId>
            <artifactId>spring-cloud-starter-openfeign</artifactId>
            <version>2.2.5.RELEASE</version>
        </dependency>
Now we can create an interface in order to call the demo-service REST endpoint. Our class is called DemoServiceClient and this interface is annotated with the @FeignClient annotation and 2 parameters (besides the @Headers annotation).
@Headers("Content-Type: application/json")
@FeignClient(value = "demoServiceClient", url = "http://${demo.service.hostName}:${demo.service.portNumber}")
public interface DemoServiceClient {

    @RequestMapping(method = RequestMethod.GET, value = "/product/{id}")
    ProductResponse getProduct(@PathVariable("id") Integer id);

}
The url is the url to our external demo-service. For the host-name and the port we use properties so we can change them for each environment. The value parameter contains a reference to the configuration-name for the HTTP connection to the demo-service.
The details on how to connect to our external service are specified in the application.yml file:
feign:
  httpclient:
    max-connections: 10
    max-connections-per-route: 8
  client:
    config:
      demoServiceClient:
        connectTimeout: 1000
        readTimeout: 500

demo:
  service:
    hostName: localhost
    portNumber: 8081
The method to call, in this case retrieving a product for an ID, is annotated with default Spring-web annotations like @RequestMapping and @PathVariable. The object that will be returned is also defined here. Jackson takes care of mapping the JSON (from our service) to the ProductResponse-class.
You can use default values for Feign or overwrite them when needed. See https://cloud.spring.io/spring-cloud-netflix/multi/multi_spring-cloud-feign.html for more details.
We’re almost done; the last thing to do is to tell Spring Boot that FeignClients should be scanned and wired. In order to do so we add @EnableFeignClients to our @SpringBootApplication annotated class.
When both applications are started we can now execute the following url:
http://localhost:8080/products
A list of products will be returned from our external service.
However, this call is a direct HTTP call without fault tolerance configured and might fail when something goes wrong in our demo-service call to retrieve products.
Adding fault tolerance for a service call
Here we go. Our fault tolerance framework is Resilience4J. See https://resilience4j.readme.io/docs/getting-started for more details.
You can use Resilience4J for:
– Circuitbreaking
– Retry-mechanisms
– Rate / time limiting
– Caching
Resilience4J has several extra modules (JAR’s) for specific functionality. See https://resilience4j.readme.io/docs/comparison-to-netflix-hystrix-1 for more information.
Now, one option is to wrap our call in a try-catch block and handle the error ourselves. Example:
    private DemoServiceClient.ProductResponse getProductFor(int id) {
        logger.info("Calling demo-service for productId {}", id);
        try {
            return serviceClient.getProduct(id);
        } catch (Exception exc) {
            logger.error("Got an error, returning default from application");
            return DemoServiceClient.defaultProduct();
        }
    }
However, we then have to create a mechanism that stops calling our demo-service when an exception occurs. Also, we have to think about a sort of a threshold in order to stop calling our demo-service, or we stop calling when only one call fails.
Thirdly, think about when do you want to start calling our real-service again?
Enter the Circuitbreaker
The circuitbreaker is a mechanism between our demo-application and our demo-service that does the error handling for us. We can configure it to stop delegating the call after n failed calls (circuitbreaker in CLOSED-STATE) and after a while try to call the real service again (HALF-OPEN state) and when it succeeds let all calls pass again (OPEN-STATE).
Configuring Resilience4J’s circuitbreaker
The first step is to add three extra dependencies for the circuitbreaker:
The circuitbreaker itself
<dependency>
    <groupId>io.github.resilience4j</groupId>
    <artifactId>resilience4j-circuitbreaker</artifactId>
    <version>1.6.1</version>
</dependency>
The Resilience4J annotation’s library for using in the client
<dependency>
    <groupId>io.github.resilience4j</groupId>
    <artifactId>resilience4j-annotations</artifactId>
    <version>1.6.1</version>
</dependency>
Spring boot for support in application.yml
<dependency>
    <groupId>io.github.resilience4j</groupId>
    <artifactId>resilience4j-spring-boot2</artifactId>
    <version>1.6.1</version>
</dependency>
For the second example we call our demo-application endpoint for retrieving all products and their details (http://localhost:8080/all). This will call our demo-service 3 times for three products. In order to test our circuitbreaker the call to our demo-service is configured to fail, so that way we can see how our demo-application’s circuitbreaker handles these failing calls.
First we need to configure the Circuitbreaker so it will handle the failing calls correctly.
This should be done at the interface to the demo-service in our demo-application project (see DemoServiceClient#getProduct):
public interface DemoServiceClient {

    @RequestMapping(method = RequestMethod.GET, value = "/product/{id}")
    @CircuitBreaker(name = "demoServiceCircuitBreaker", fallbackMethod = "demoServiceFallbackMethod")
    ProductResponse getProduct(@PathVariable("id") Integer id);

    default ProductResponse demoServiceFallbackMethod(Integer id, Exception exc) {
        LOGGER.error("Got an error, executing fallbackmethod and returning default from application");
        return DemoServiceClient.defaultProduct();
    }

}
We do so by adding the @Circuitbreaker annotation on the method to be wrapped.
The first argument for that annotation is name and contains a reference to the circuitbreaker’s configuration. This configuration should be added to the application.yml file.
The second parameter is the name of a fallback-method which is called whenever an exception occurs when calling our service. Not all situations are suitable for having a fallback-method but for this example we will show you how to do so. Make sure that the fallback-method has exactly the same signature as our original method but with one extra parameter (the Exception). For this example I’ve used an interface so our fallback-method has the default-keyword but it is also possible to use a class as long as the @CircuitBreaker method is the only public method to be called, and the class is wired as a Spring bean (because Resilience4j will create a Proxy object to call the method and wrap it with the circuitbreaker-code).
Configuration explained
Several properties can be set for the circuitbreaker; find details for them here: https://resilience4j.readme.io/docs/circuitbreaker.We can define a default config and inherit all other configurations from this default config (by using the baseConfig keyword). Specific properties can be overridden per service.
resilience4j:
  circuitbreaker:
    configs:
      default:
        failureRateThreshold: 50                 #  Configures the failure rate threshold in percentage. When the failure rate is equal or greater than the threshold the CircuitBreaker transitions to open and starts short-circuiting calls.
        slowCallRateThreshold: 50                # Configures a threshold in percentage. The CircuitBreaker considers a call as slow when the call duration is greater than slowCallDurationThreshold
        slowCallDurationThreshold: PT5S          # Configures the duration threshold above which calls are considered as slow and increase the rate of slow calls.
        permittedNumberOfCallsInHalfOpenState: 3 # Configures the number of permitted calls when the CircuitBreaker is half open.
        slidingWindowType: COUNT_BASED           # If the sliding window is COUNT_BASED, the last slidingWindowSize calls are recorded and aggregated.
        slidingWindowSize: 10                    # Configures the size of the sliding window which is used to record the outcome of calls when the CircuitBreaker is closed.
        minimumNumberOfCalls: 2                  # Configures the minimum number of calls which are required (per sliding window period) before the CircuitBreaker can calculate the error rate or slow call rate.
        waitDurationInOpenState: PT5S            # The time that the CircuitBreaker should wait before transitioning from open to half-open.
        recordExceptions:                        # A list of exceptions that are recorded as a failure and thus increase the failure rate. Any exception matching or inheriting from one of the list counts as a failure, unless explicitly ignored via ignoreExceptions.
        ignoreExceptions:                        # A list of exceptions that are ignored and neither count as a failure nor success. Any exception matching or inheriting from one of the list will not count as a failure nor success, even if the exceptions is part of recordExceptions
    instances:
      demoServiceCircuitBreaker:
        baseConfig: default
For this demo the slidingWindowType (set to COUNT_BASED) and the minimalNumberOfCalls are important. The minimalNumberOfCalls was set to 2 which means that after 2 calls to our failing service, the error rate can be calculated. Because all calls to our service fail the error rate is 100% after two calls.
Since the failureRateThreshold was set to 50 (percent) the circuitbreaker will open after these 2 calls. Only the first two calls will be delegated to our service however the third call will not make it to our service, it is blocked by our circuitbreaker since it was open after two calls.
By default all exceptions will count as a failure but we can define a list of exceptions that can be ignored (and not count as a failure). This is done through the ignoreExceptions property
Since we expect our service to recover after some time, we can define how long we want to block the calls to our service before we want to try it again. The property waitDurationInOpenState defines how long we need to wait before we can let another call go through.
In this example we wait for 5 seconds before our circuitbreaker transitions to the HALF_OPEN state. In this state a number of calls go through. The number of calls that are allowed in HALF_OPEN state can be configured using the permittedNumberOfCallsInHalfOpenState.
As soon as the failure rate is below the configured threshold, the circuitbreaker’s state transitions from HALF_OPEN to CLOSED. As of then all calls will be let through and our service will be called continuously again. If the failure rate is equal or above the configured threshold, the circuitbreaker transitions back to OPEN.
With the slidingWindowSize property we can define how much calls we want to have in our window and to calculate the failure rate from. Since it’s a sliding window it will remove the first call (when the max. size is reached) and it adds the new call to the end of the window. After that the failure rate is calculated again.
Testing our setup
To test our setup we execute http://localhost:8080/all. This request tries to retrieve 3 products subsequently. To check that our circuitbreaker is working we made our demo-service throw an exception when the endpoint for retrieving product information is called.
Normally we would see 3 log-statements in our demo-service logging that this endpoint was called for a specific product ID. However since the circuitbreaker opens after two failing calls you will only see the calls for the first two products (demo-service called for productId 1 and 2). The third call (for product ID = 3) will not make it to our service but is blocked by our circuitbreaker since it was open after two calls.
Metrics
Resilience4j provides a module for Micrometer which supports most popular monitoring systems like InfluxDB or Prometheus. Metrics like number of successful/failed calls, the state of the circuitbreaker, the failure rate and even slow calls can be monitored.
Next steps
The circuitbreaker is only a small part of the Resilience4J library and it offers much more functionality for other use cases. With this blog I showed you the first steps on how to start with the Resilience4J Fault tolerance framework. Hopefully you will quickly master the basics using this library. After that it should be pretty straightforward to configure all other functions like rate-limiting, caching or retry-functionality.
Enjoy!
PS If you have any questions about this or other topics please contact me at richard@craftsmen.nl Meanwhile stay up-to-date with Craftsmen on LinkedIn.
PS2 (Header) Image credits Wikipedia.