A while back, my Synology NAS 2415+ broke down after 6 years of trusted service.
• Diagnosis: faulty motherboard.
• Original price: € 980,00.
• Motherboard replacement: € 680,00.
• Conclusion: not worth repairing.
• Solution: time for a serious upgrade.
After looking around and watching numerous videos online, I found my new NAS of choice: QNAP Systems TVS-H1288X-W1250-16G 12 Bay, with 2 x 2TB M.2 cache, 2 x 2 2TB SSD and 2 x 18TB new hard drives.
Now, the fun part begins.
On my old Synology NAS I had 9 bays in use, out of 12. With around 43TB of storage in the form of movies, series, music, photos, documents and backups. I was hopeful that somehow the drives from the Synology would be interchangeable with the QNAP, but unfortunately that is not the case.
The Synology uses another format than the QNAP. Any Synology drive that you put in a QNAP, is not recognized. The only way to use that drive is to create a new storage pool, resulting in loss of data.
Picture me getting slightly nervous.
The easiest solution would, of course, have been to buy another Synology (or try to fix the old one myself), so the drives could just be swapped, but I still wanted to go for the QNAP. So before buying a QNAP, I did some online research on how to migrate the data from the Synology drives to QNAP drives.
VirtualBox, Ubuntu VM and an old Integral HDD copier to the rescue
After some online searching I found that one way to go is to mount a Synology drive in Ubuntu and access its data that way. I did not want to create a dual boot on my Windows 10 machine, so I decided to go for VirtualBox and install an Ubuntu VM on it.
I still have an old USB Integral HDD copier lying around somewhere, gathering dust, which in this case comes in very handy. Transferring data is slow, but hey, it does the job. I have not lost my data.
Below are the steps I followed. Since there is lots of great content around on YouTube, I have just included some links for these steps.
Step 1 – Install VirtualBox and Oracle VM VirtualBox Extension Pack
The first step was downloading and installing Oracle VirtualBox and Oracle VM VirtualBox Extension Pack. You find a good instruction video here.
Step 2 – Download Ubuntu VM image and install it in VirtualBox
Then I downloaded and installed Ubuntu 21.04. See instruction video.
Step 3 – Mount HDD and make it recognizable within Ubuntu image
So, now that we have an Ubuntu VM running, we need to make the physical Synology drive visible when we start up our Ubuntu VM. To do this, I connect the Integral HDD copier via USB to my Windows 10 PC on which the VirtualBox with the Ubuntu image is running.
The USB drive becomes available as an additional drive in Windows. In VirtualBox you can attach a physical storage device by adding a controller to your VM. To do this, you need to create a vmdk file first, which is just a very small file that simply points to your physical drive. VirtualBox calls this Raw Hard Disk Access.
Create a vmdk file
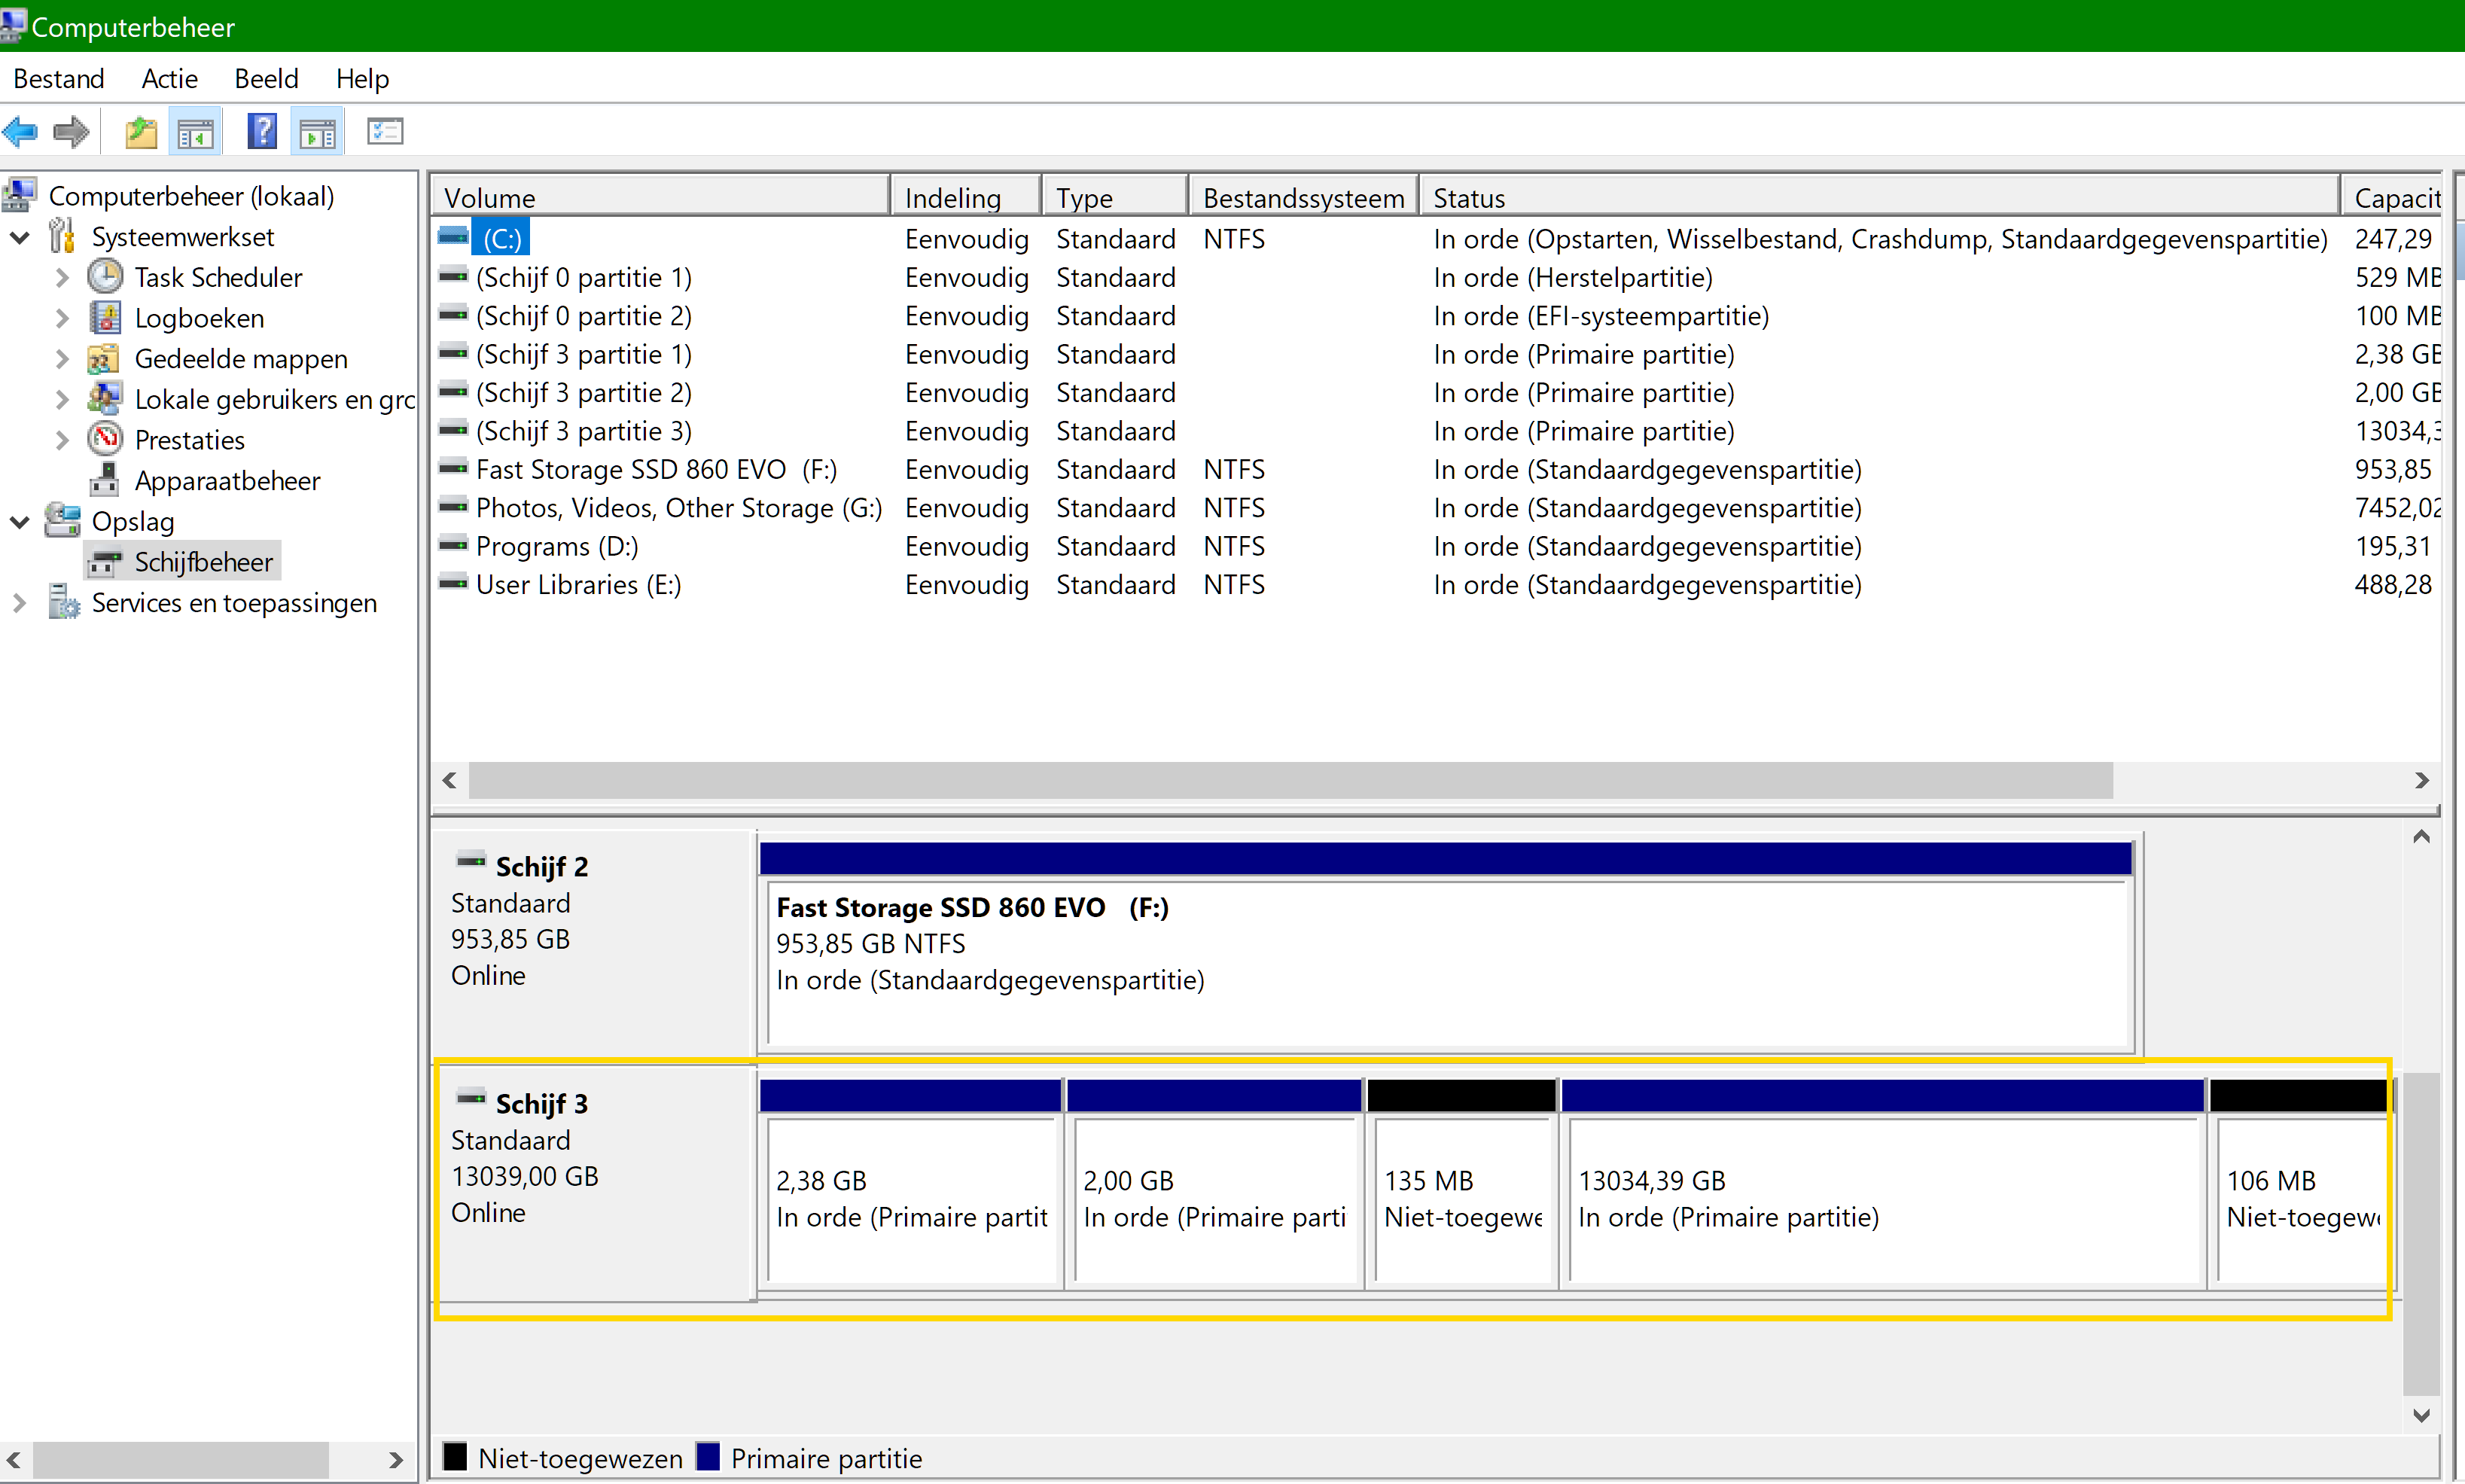
To create a vmdk file, you first need to find out which drive is the Synology drive. In Windows you can do this by going to Disk Management (right click My Computer on the desktop and click Maintain, then go to Storage, then Disk Management). In my case the USB drive is number 3 (Schijf 3).
Once you have determined the path and drive number, you can go ahead and create a vmdk file. I created a batch file called mountDisk3 for this, so I can run that whenever necessary, with the following content:
SET "VMDK=E:\Users\Manfred\VirtualBox VMs\Ubuntu 21.04\Ubuntu 21.04.vmdk"
VBoxManage internalcommands createrawvmdk -filename "%VMDK%" -rawdisk \\.\PhysicalDrive3
The VMDK variable contains the path where the vmdk file should be created. This is also the location where the vm files are located that were created in step 2. On the second line I can call VBoxManage because I added this to the Windows path environment variable (which is not default when you install VirtualBox).
But you could also use the full path of the VBoxManage location instead. For more details read this article.
Run the batch file as administrator and the final vmdk file will look something like this:
# Disk DescriptorFile
version=1
CID=d93ea54b
parentCID=ffffffff
createType="fullDevice"

# Extent description
RW 27344764928 FLAT "\\.\PhysicalDrive3" 0

# The disk Data Base
#DDB

ddb.virtualHWVersion = "4"
ddb.adapterType="ide"
ddb.geometry.cylinders="16383"
ddb.geometry.heads="16"
ddb.geometry.sectors="63"
ddb.uuid.image="b2638562-5955-4928-b5ff-c3dff7614639"
ddb.uuid.parent="00000000-0000-0000-0000-000000000000"
ddb.uuid.modification="69b7a575-f578-4cb2-84af-3e426b9fd213"
ddb.uuid.parentmodification="00000000-0000-0000-0000-000000000000"
As described in the Synology knowledge center article on recovering data on a PC for a Synology drive when the NAS malfunctions, you need to install mdadm and lvm2 RAID management tools by starting the Ubuntu VM, login and open a command terminal (Ctrl-Alt-T). Then provide the following commands:
sudo -i
apt-get update
apt-get install -y mdadm lvm2
Once that’s done, you need to shutdown the VM again.
Next, you need to add a controller to your VM and point that to the vmdk file. Although Linux based instead of Windows, this instruction video explains it quite well. The steps to add the vmdk file are:
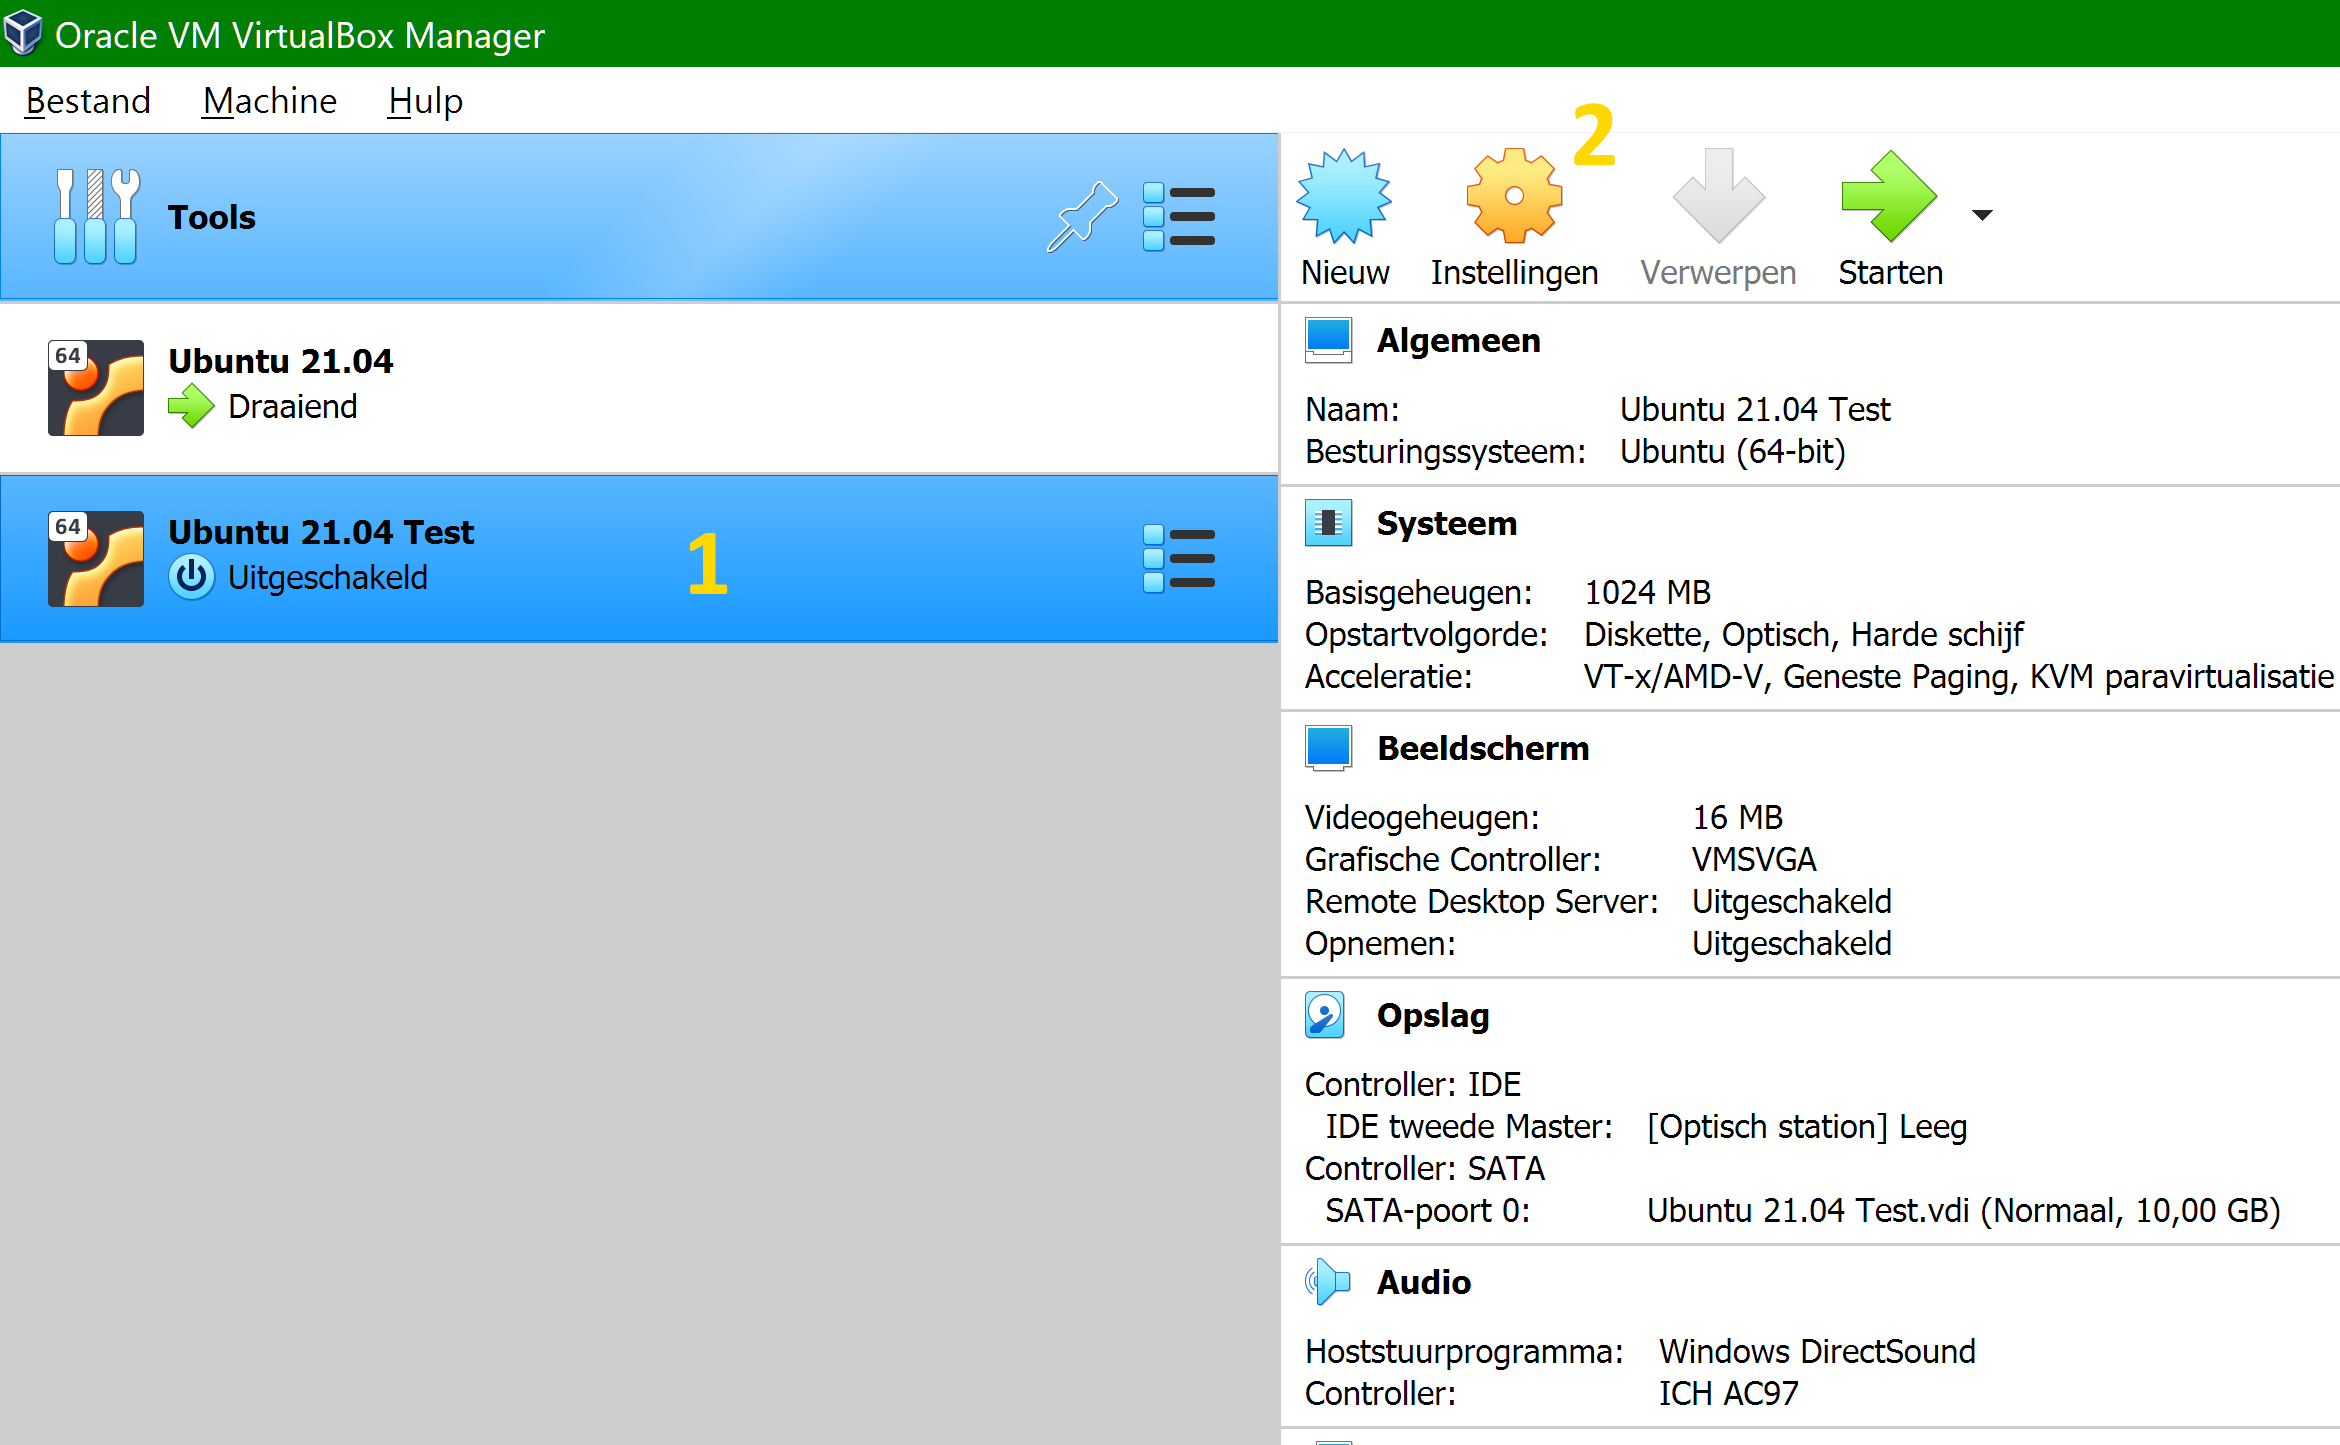
1. Select the VM.
2. Select Settings.

3. Select Storage.
4. Select Add New Storage Controller.

5. Select Add New Storage Controller.
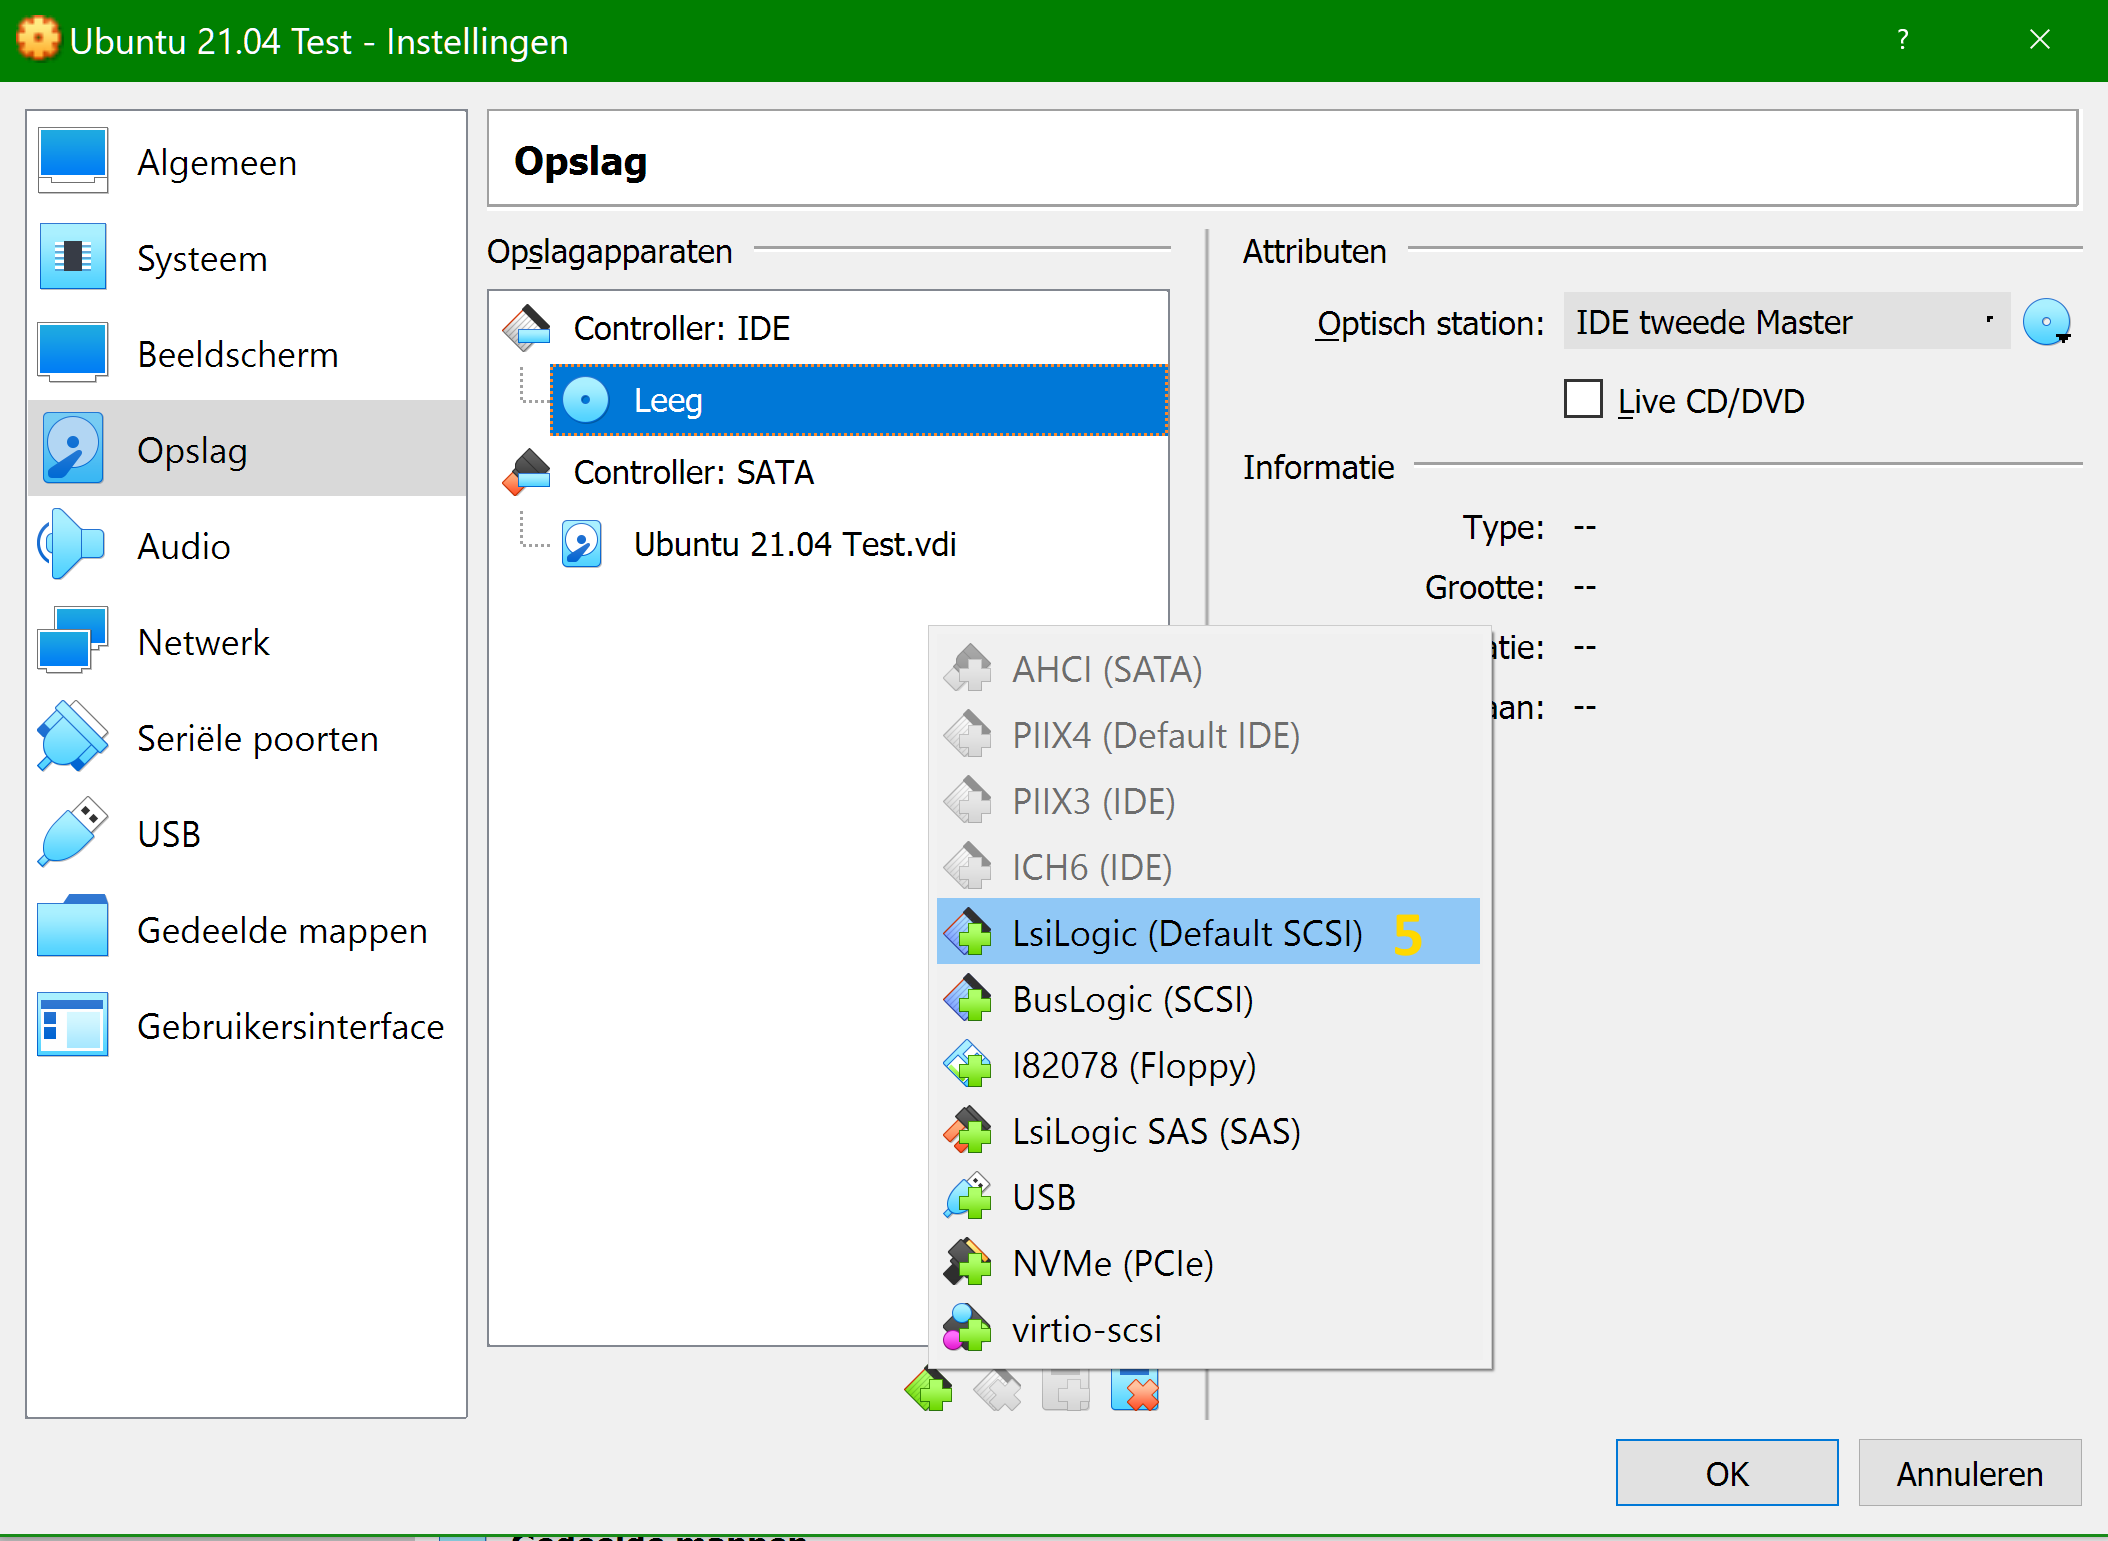
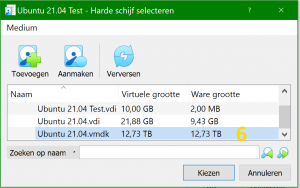
6. Select the vmdk pointing to the physical drive.
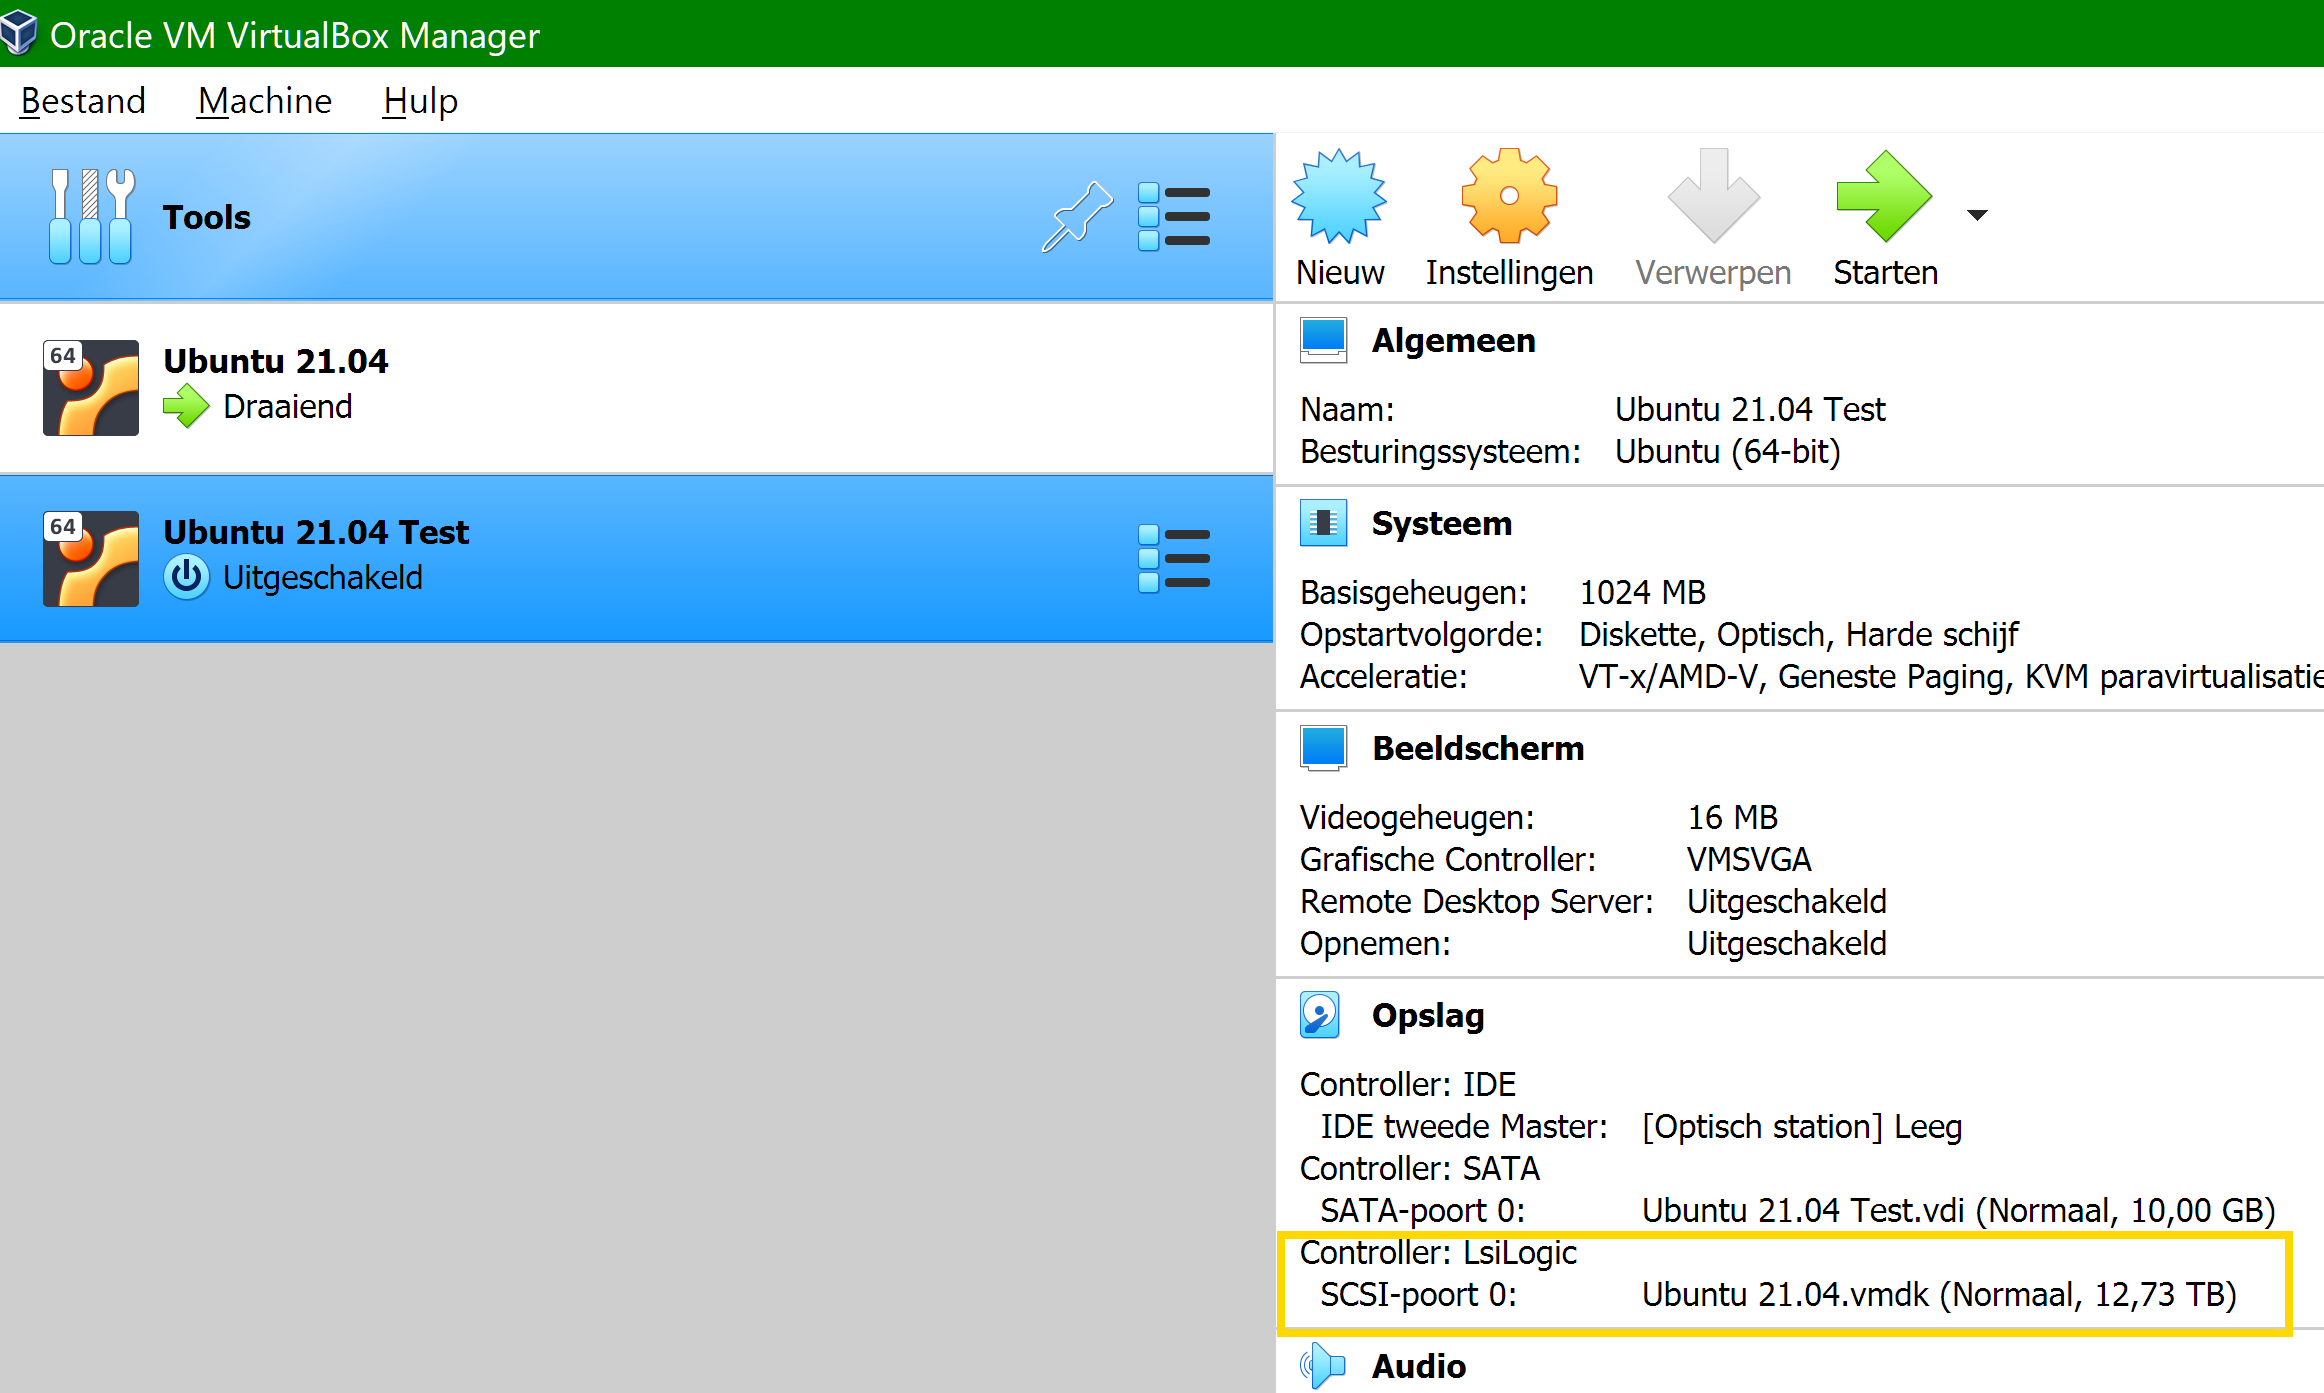
The LsiLogic storage controller has been added:

Step 4 – Adding shares
On the new QNAP NAS I created a RAID 1 M.2 caching pool and a RAID 1 SSD storage pool. And two more thick storage pools for each of the two new 18TB drives, configured as RAID 0. In the second storage pool I created a shared volume Movies. This shared volume should now be accessible in the Windows network.
But to be able to access the share from our Ubuntu image, we first need to install and configure Samba by starting the Ubuntu VM, log in and open a command terminal (Ctrl-Alt-T): Then provide the following command:
sudo apt install samba samba-common-bin
Then open and configure smb.conf :
sudo nano /etc/samba/smb.conf
Under the [global] section change the workgroup if yours is different from the default Windows WORKGROUP . In my case the workgroup is HOME . Right below that, add client min protocol = “NT1” :

Save the changes (Ctrl-O, Enter) and exit (Ctrl-X). Then shutdown the VM again.
The only thing left to do now is to add shares to the VM which point to the newly shared volumes on the NAS, to copy the data from the mounted Synology drive to the new drive on the QNAP:
1. Select the VM.
2. Select Settings.
3. Select Shared folders.
4. Select Add shared folder.

5. Select the shared volume on your NAS, which should be visible in your network.
6. Enter a name for the share which will appear in the file manager on Ubuntu.
7. Select autoconnect so that the share is automatically mounted.
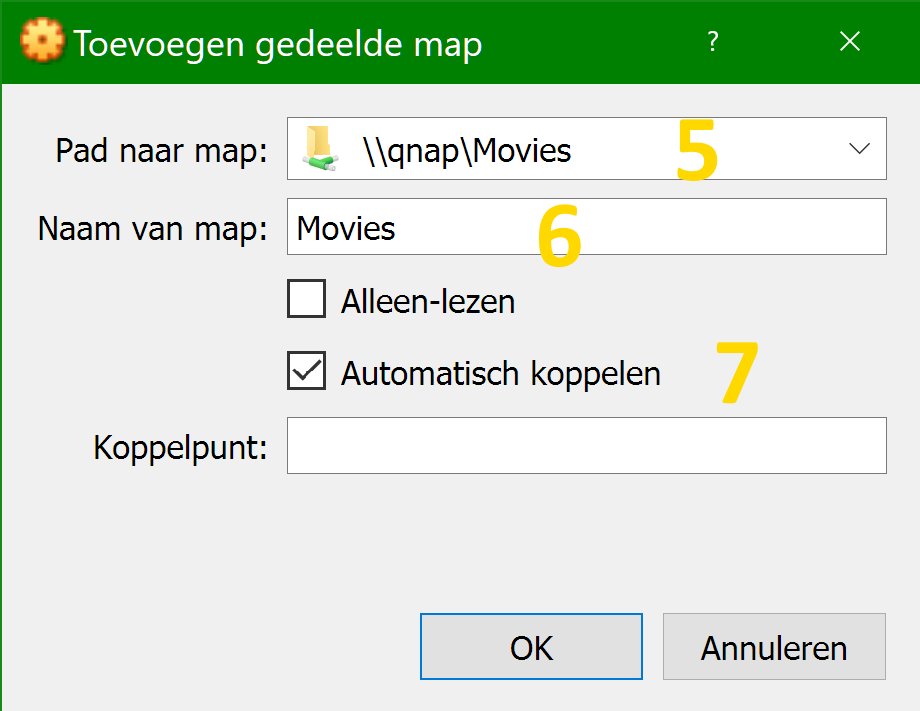
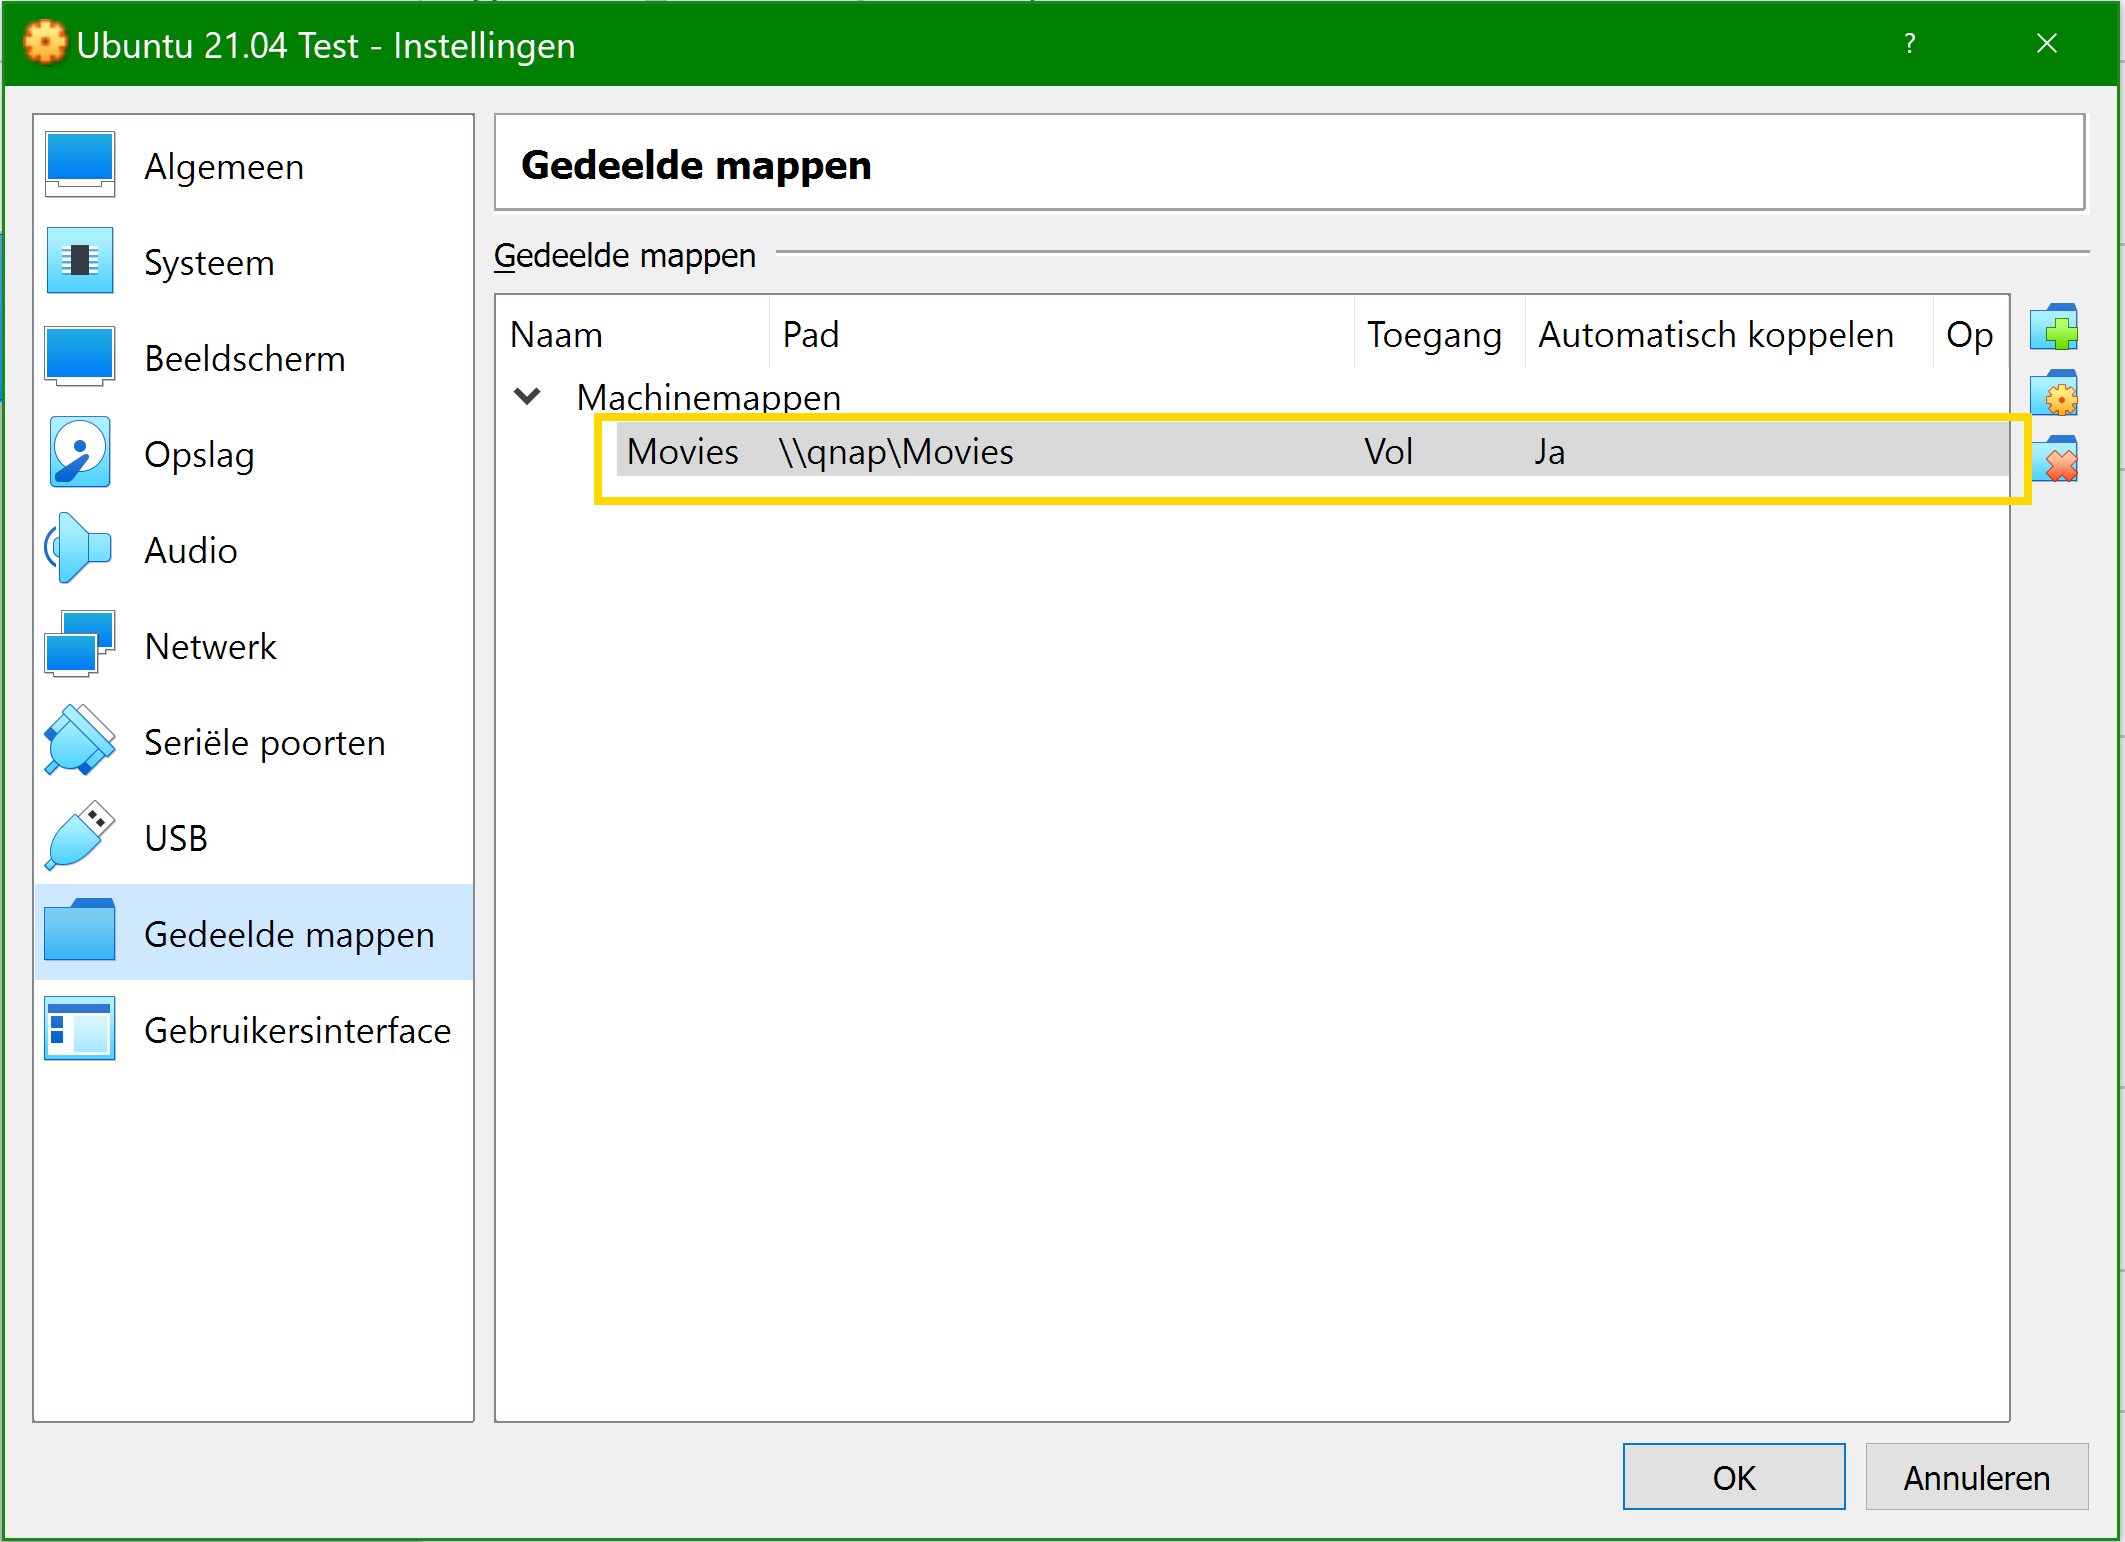
The share has been added:
Instead of using a network share, you could also add a folder on the Windows host as a share:

Make sure your user is added to the vboxsf group. This can be done by opening a terminal (Ctrl-Alt-T) and then provide the following command:
sudo adduser $USER vboxsf
Step 5 – Booting into the VM and copy data from Synology drive to new QNAP drive
Now that everything is set up, we can log on into the VM, open the file manager and copy the files from the Synology drive to the QNAP drive.
One thing to be aware of, though: you need to start VirtualBox as an administrator. If you do not run as administrator, you get an error on booting the image. Stating that the physical drive cannot be accessed.
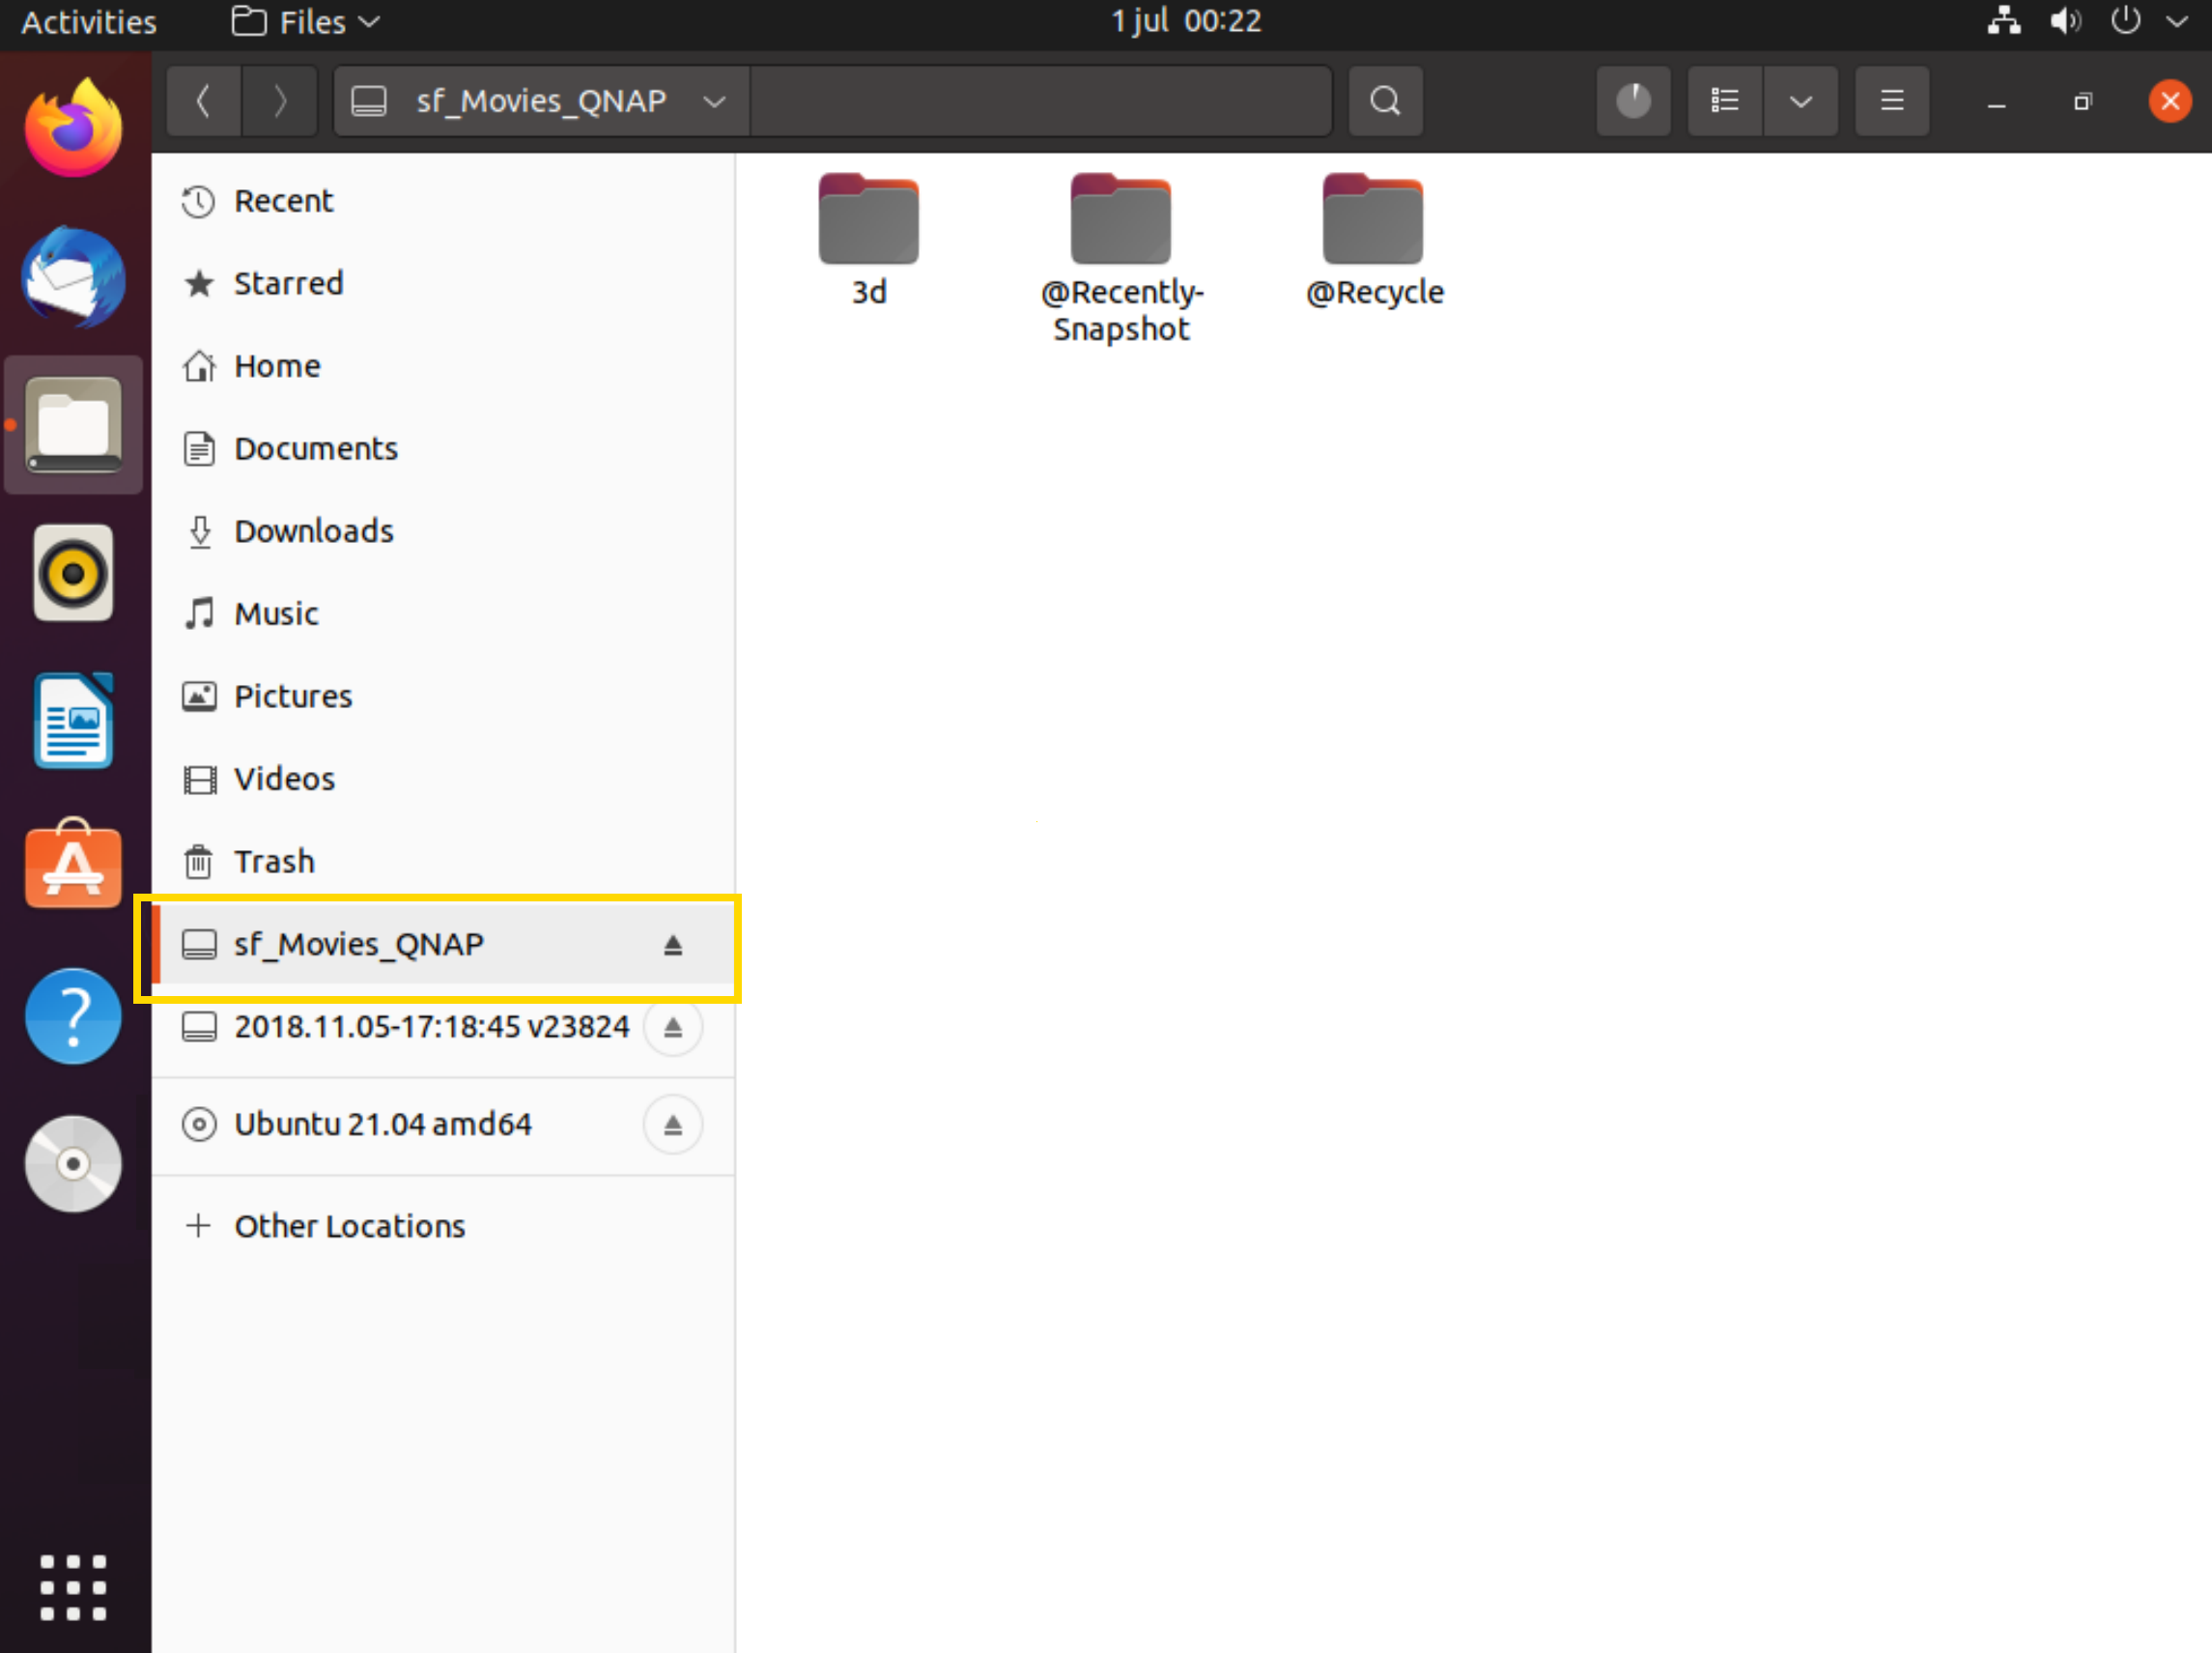
If we open up the file manager in Ubuntu, we can see our mounted Synology drive and we can access the Movie folder, and select and copy all content in that folder:
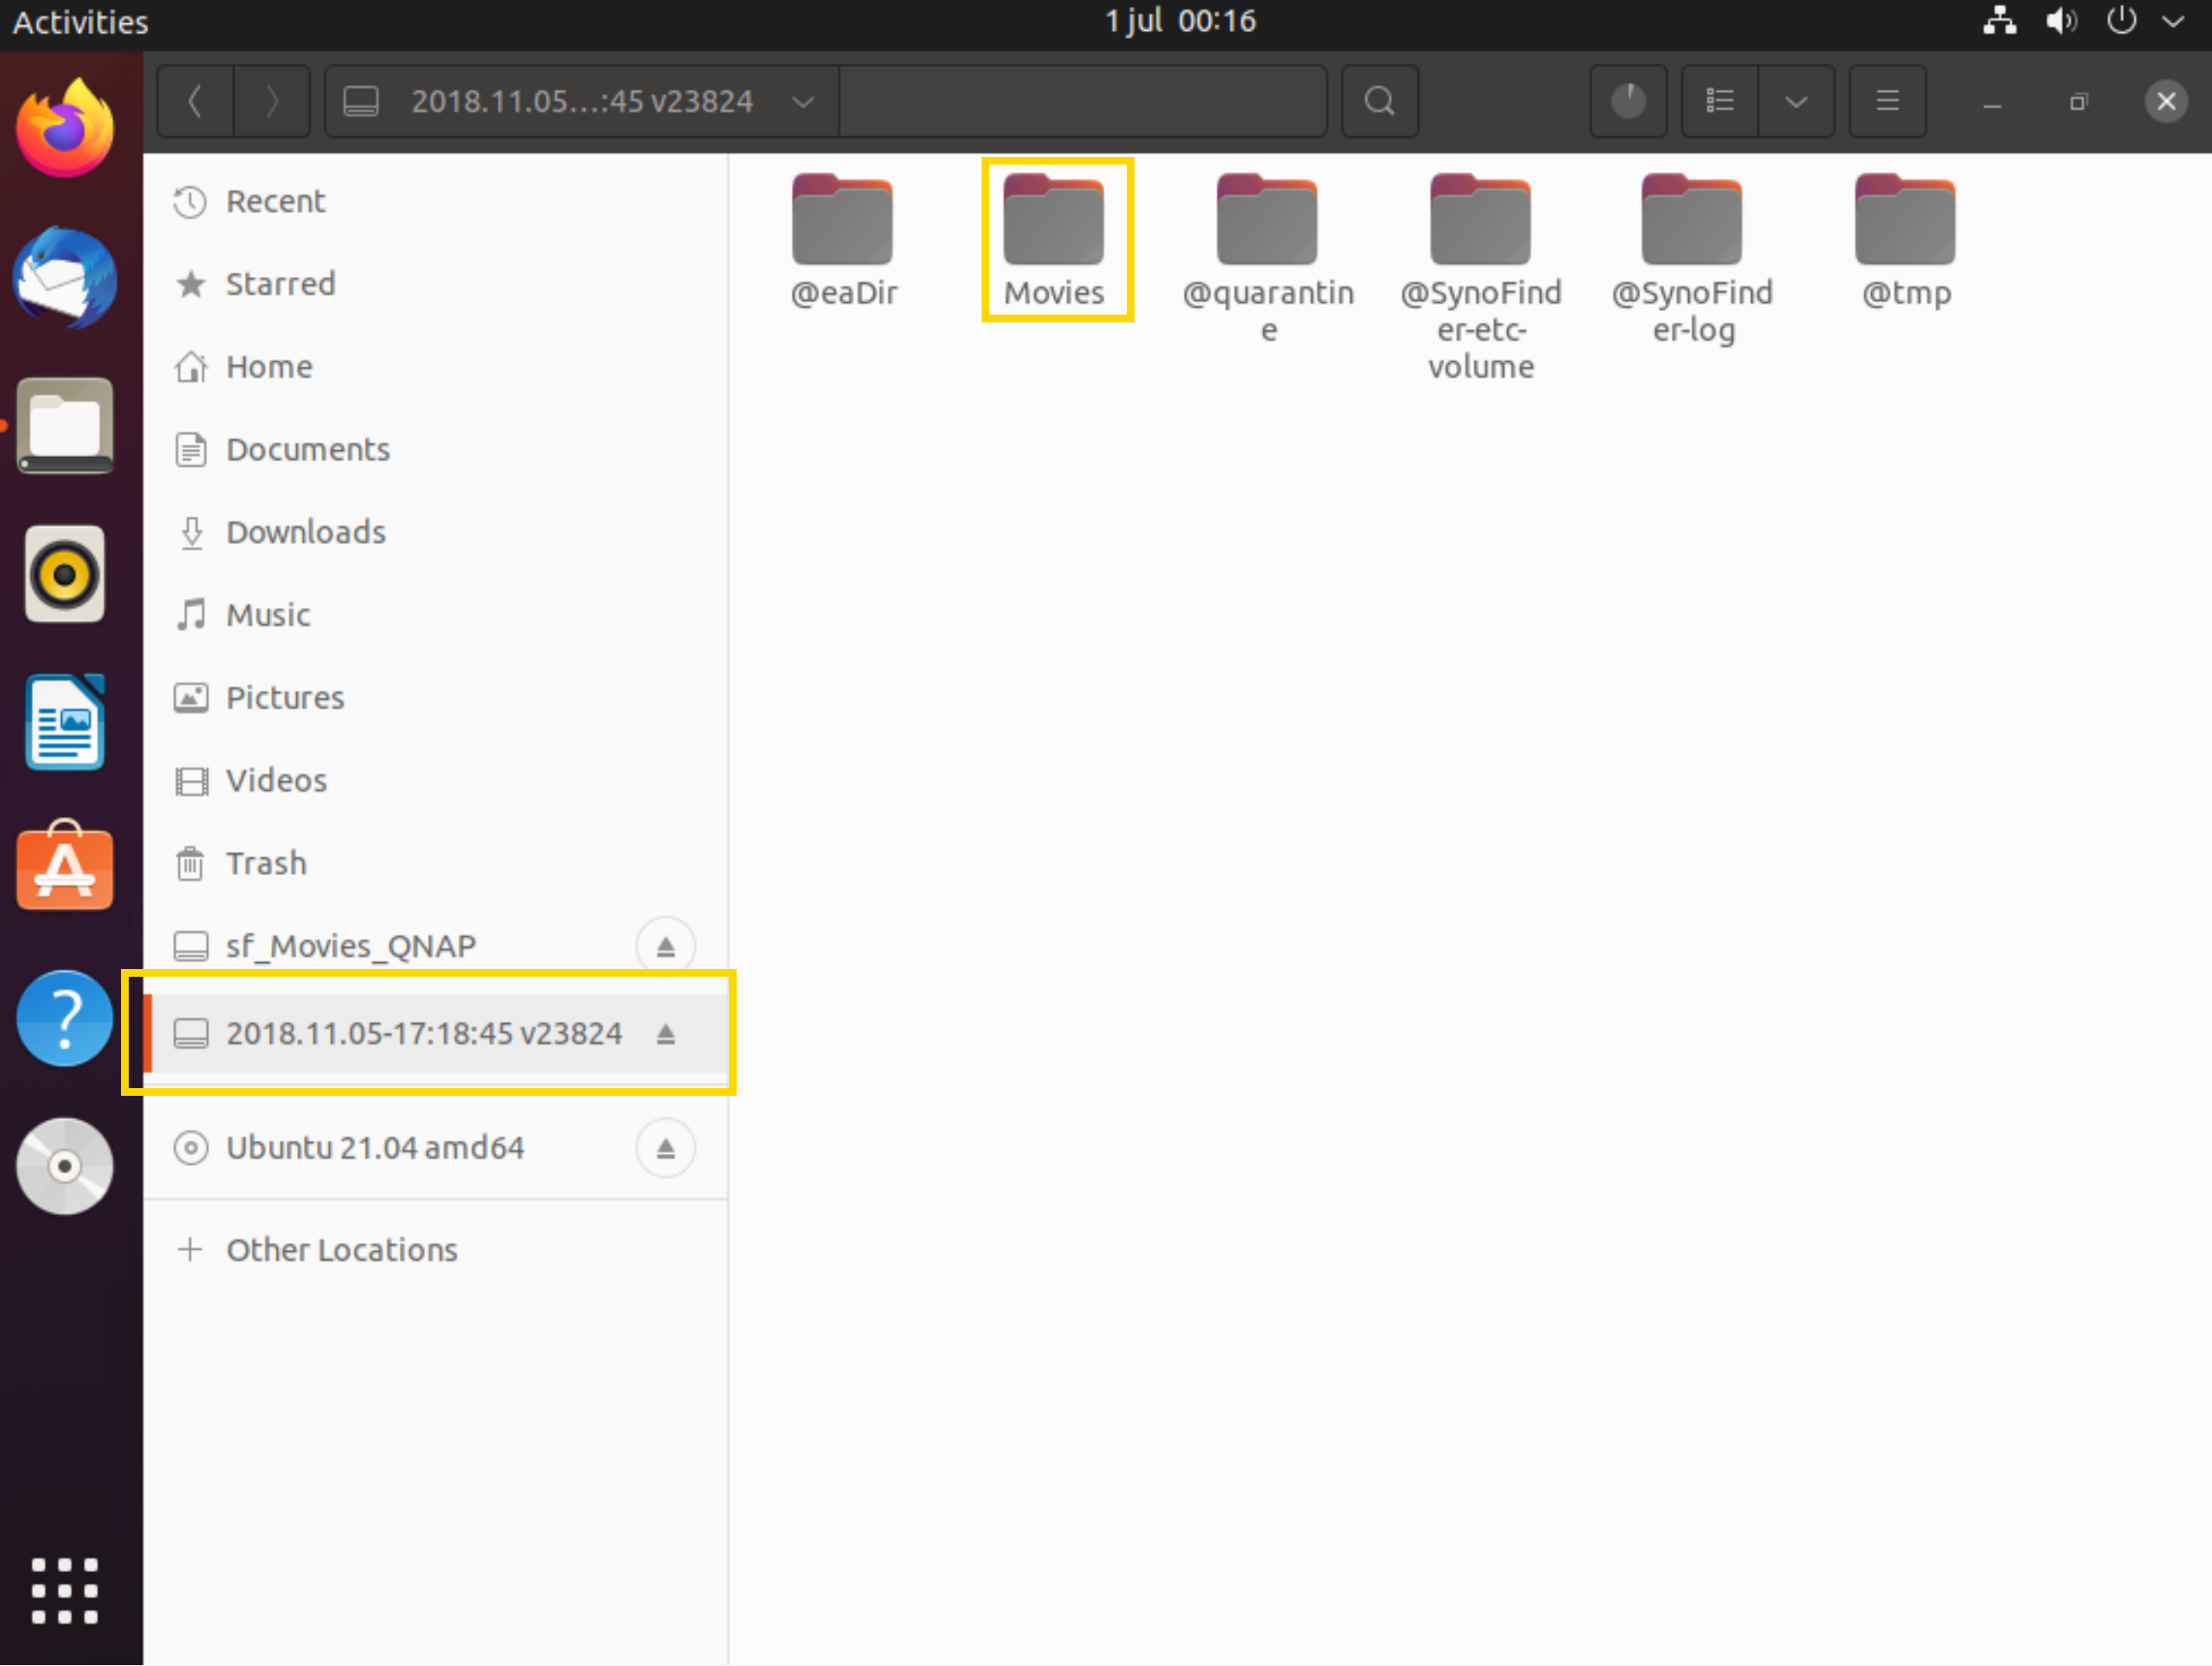
Here we see the shared Movies volume on the QNAP NAS where we can copy the content to:
And now we have to be patient, very patient, ‘till all the data has been copied.
Further steps
In case you need to copy data from other Synology drives, you need to create a new vmdk as described in Step 3 – Mount HDD and make it recognizable within Ubuntu image and update the LsiLogic storage controller with that new vmdk file.
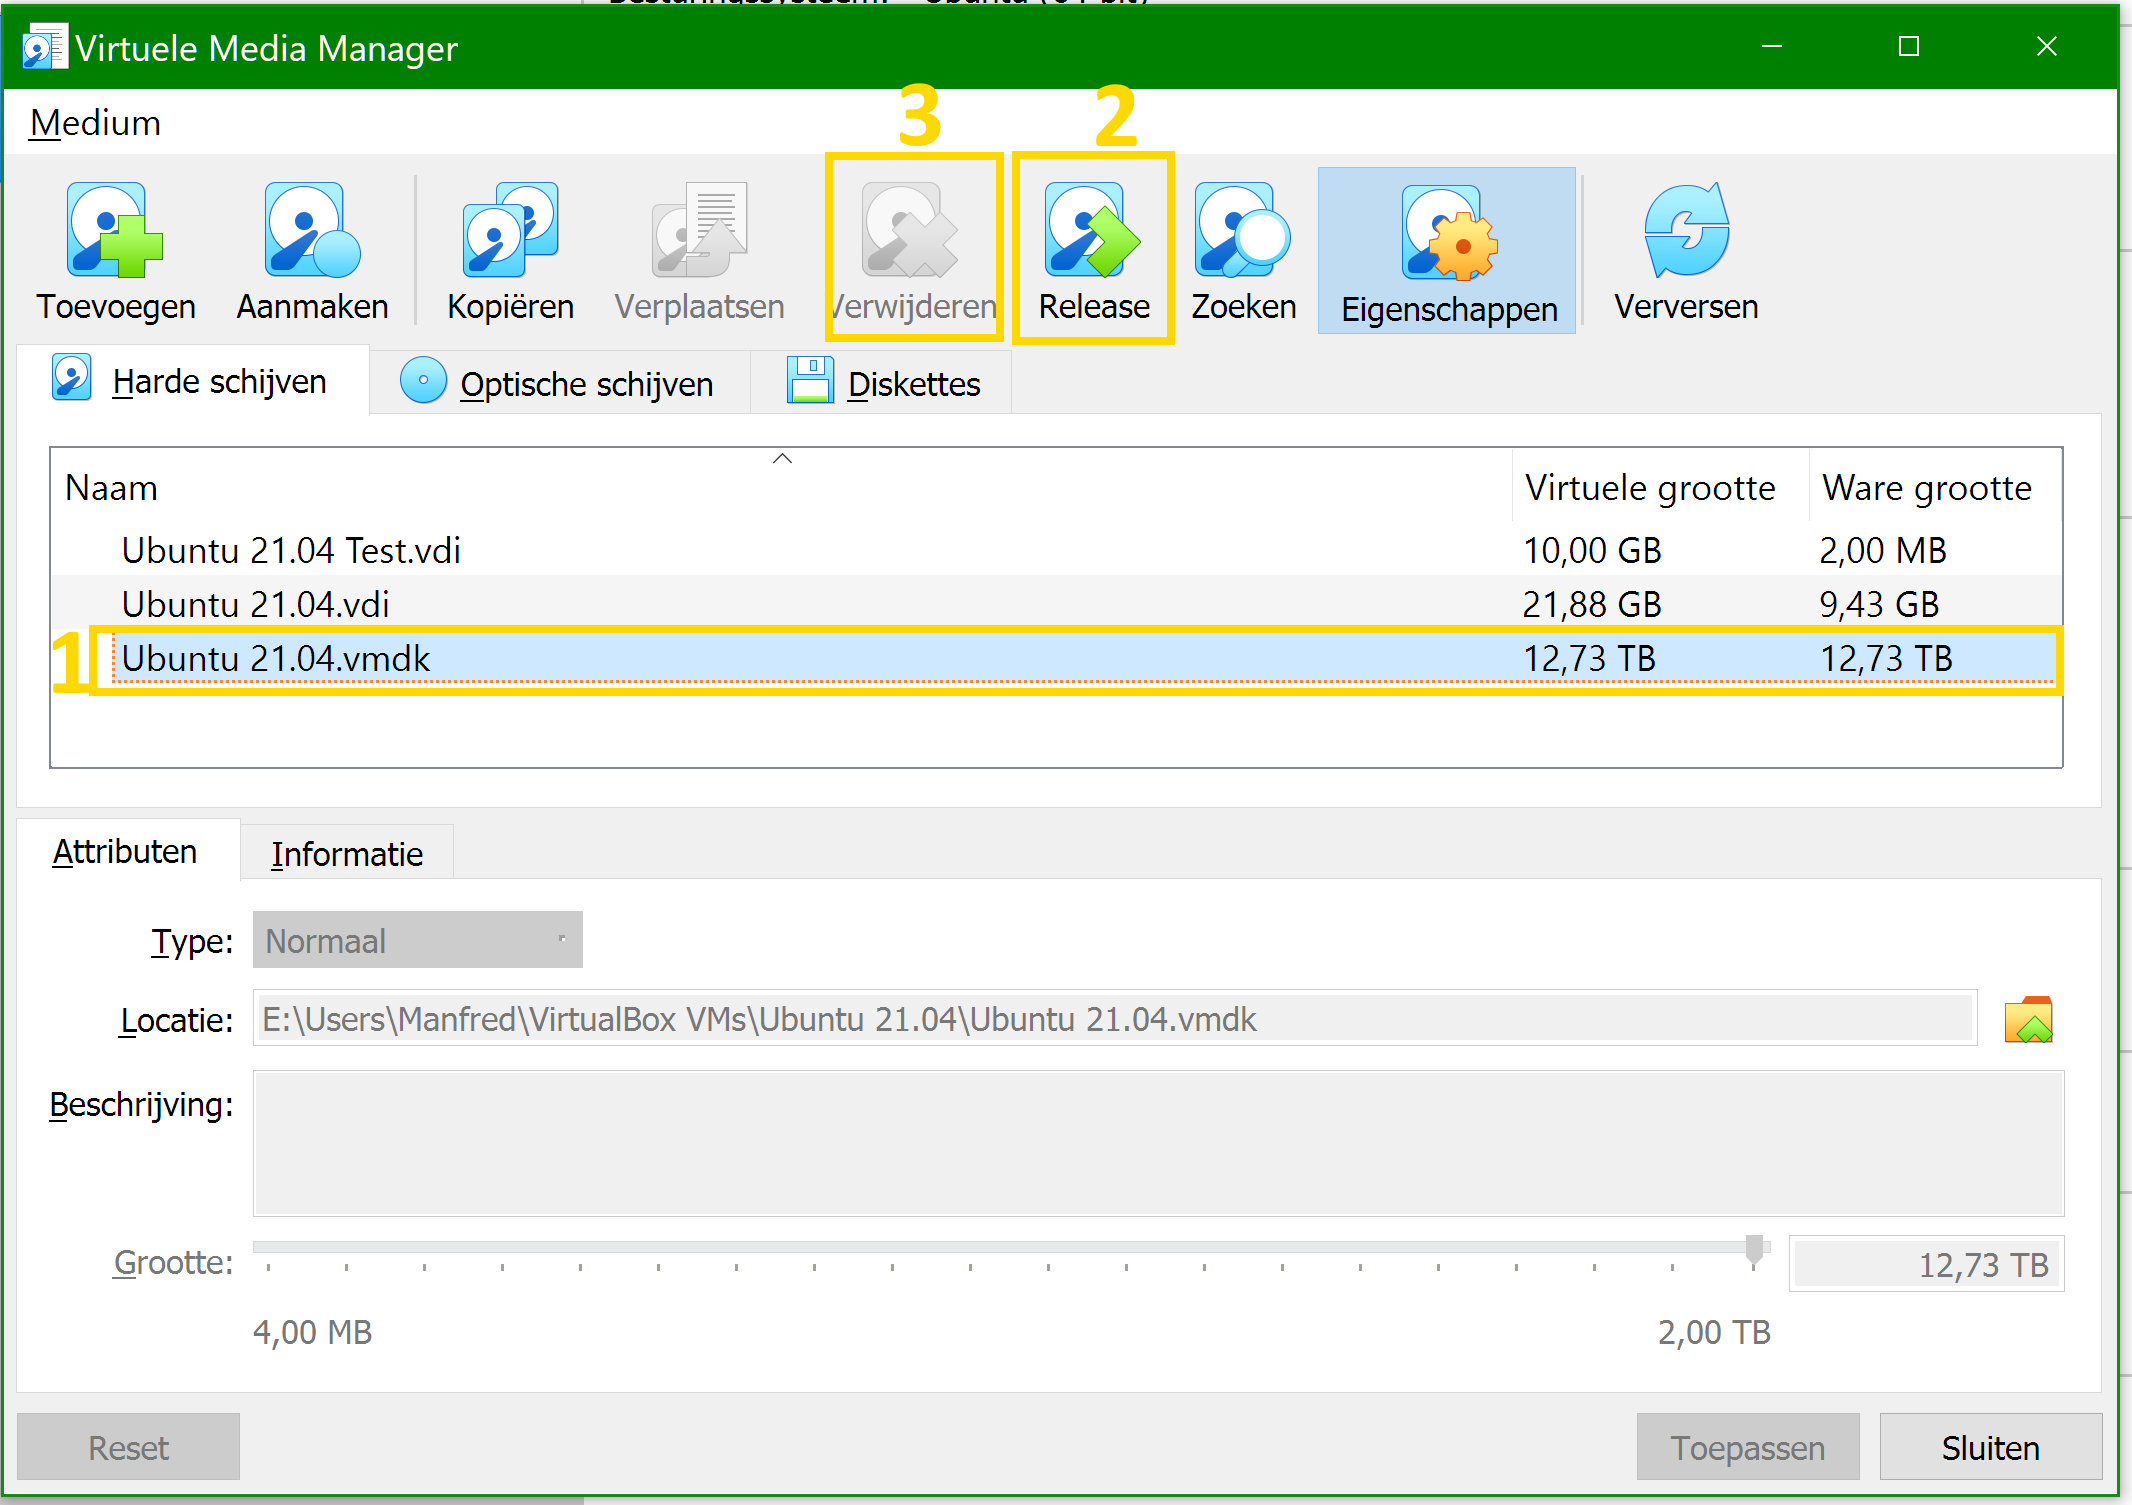
Before you do that, you first need to release and remove the current vmdk file. Each drive and therefore each vmdk file is different.
VirtualBox had a special Virtual Media Manager menu for that: choose File, then Virtual Media Manager to access it. Here you can select the vmdk file which is currently in use (1) and then select release (2) followed by remove (3).
Conclusion
Unfortunately, you cannot move a Synology drive to a QNAP NAS without losing the data on the original drive. But there are ways to still access your Synology drives without actually having a Synology NAS, and copy over the data to a new QNAP drive. In this blog I described one way of doing that.
I was always pretty impressed by the Synology DSM interface, but the QNAP is at a whole different level. So far, I like what I have seen.
Alternative solution(s)?
If you find all of the above too much hassle, you could also go for another option, using some (non free) software tools that can make your drive readable under windows. There is UFS Explorer Professional Recovery, but that’s a rather expensive solution. They also have a cheaper alternative, UFS Explorer Standard Access, which in most cases will be sufficient.
Resources
• QNAP Systems TVS-H1288X-W1250-16G 12 Bay
• What Happens When you Remove a Synology HDD and put it in a QNAP NAS?
• Downloading and installing Oracle VirtualBox
• Instruction video installing OracleVirtualBox
• Download and install Ubuntu 21.04
• Instruction video installing Ubuntu 21.04 on VirtualBox
• Using a Physical Hard Drive with a VirtualBox VM
• Using a Physical Hard Drive with a VirtualBox VM – Raw Disk Access
• Synology knowledge centre: how to recover data on a PC when Synology NAS malfunctions
• Install and Configure Samba Server on Ubuntu for File Sharing
• UFS Explorer Professional Recovery
• UFS Explorer Standard Access